Setting up Firebase Analytics for React Native iOS app built in Expo

(Updated 8/12/23)

According to the Expo docs, you cannot run Firebase Analytics alongside Expo Go. I think this is misleading, because in my experience, you can get Analytics running, you just can’t call it from within Expo Go. You can call Analytics from apps built with eas, which is likely what you are running in production anyway.

Here are the steps I took to set up Firebase Analytics for iOS. I am not sure if this will work for Android builds.

Installing packages

You will need to install several packages from your command line.

> npx expo install expo-dev-client
> npx expo install expo-build-properties
> npx expo install @react-native-firebase/app @react-native-firebase/analytics @react-native-firebase/perf @react-native-firebase/crashlytics

Create your Firebase project

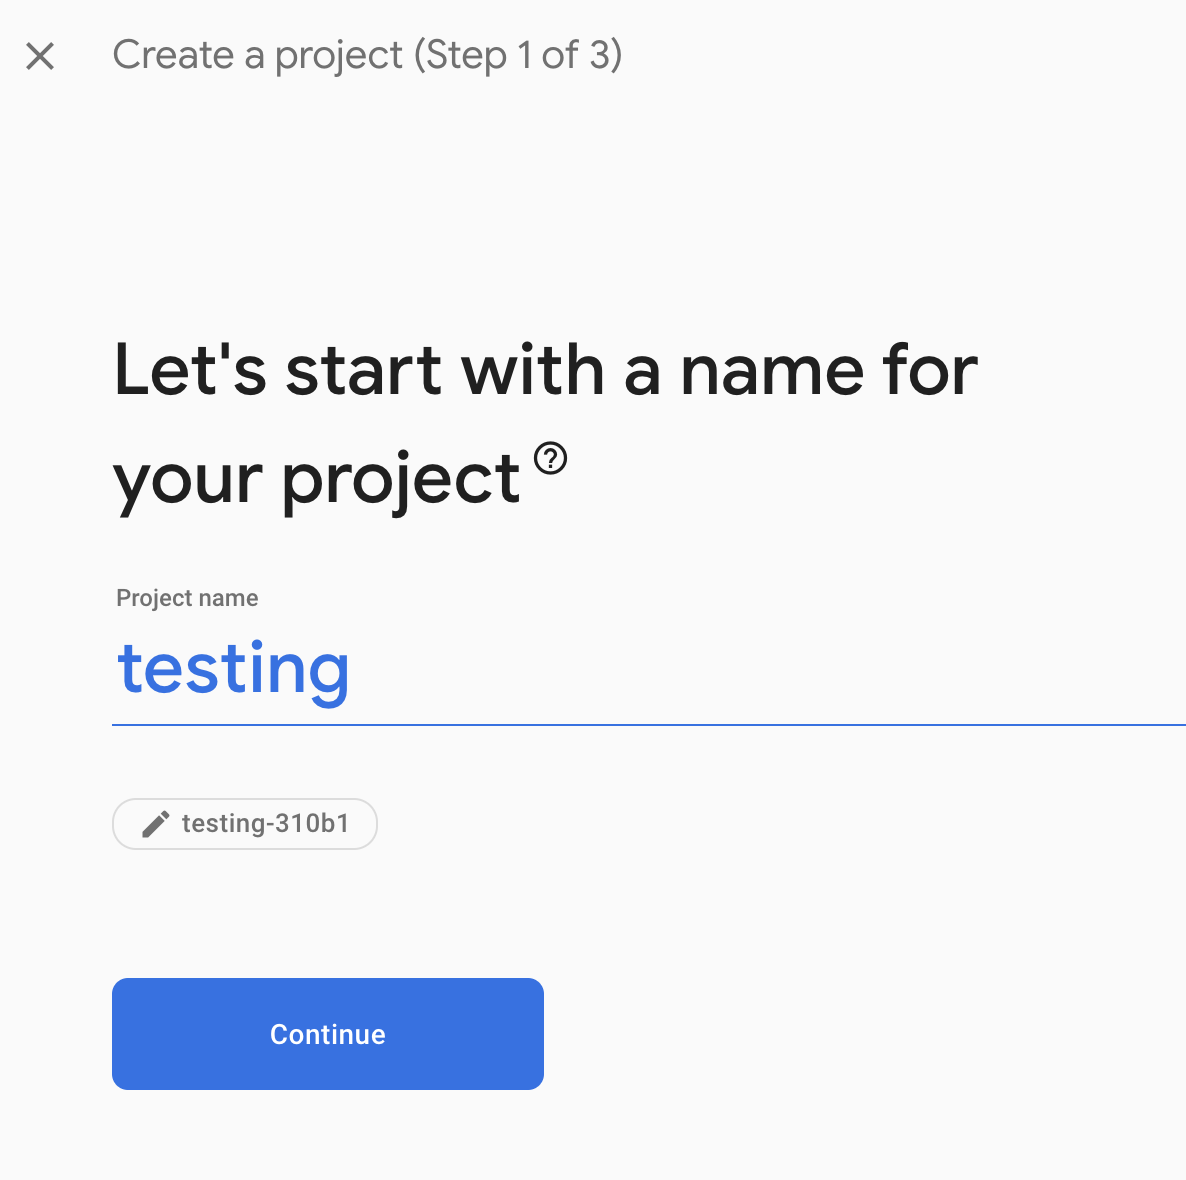
Add a new project from the Firebase console: https://console.firebase.google.com/u/0/

Enter your project name

Make sure you select “Enable Google Analytics for this project”. You may have to go through additional setup if you haven’t previously used Google Analytics.

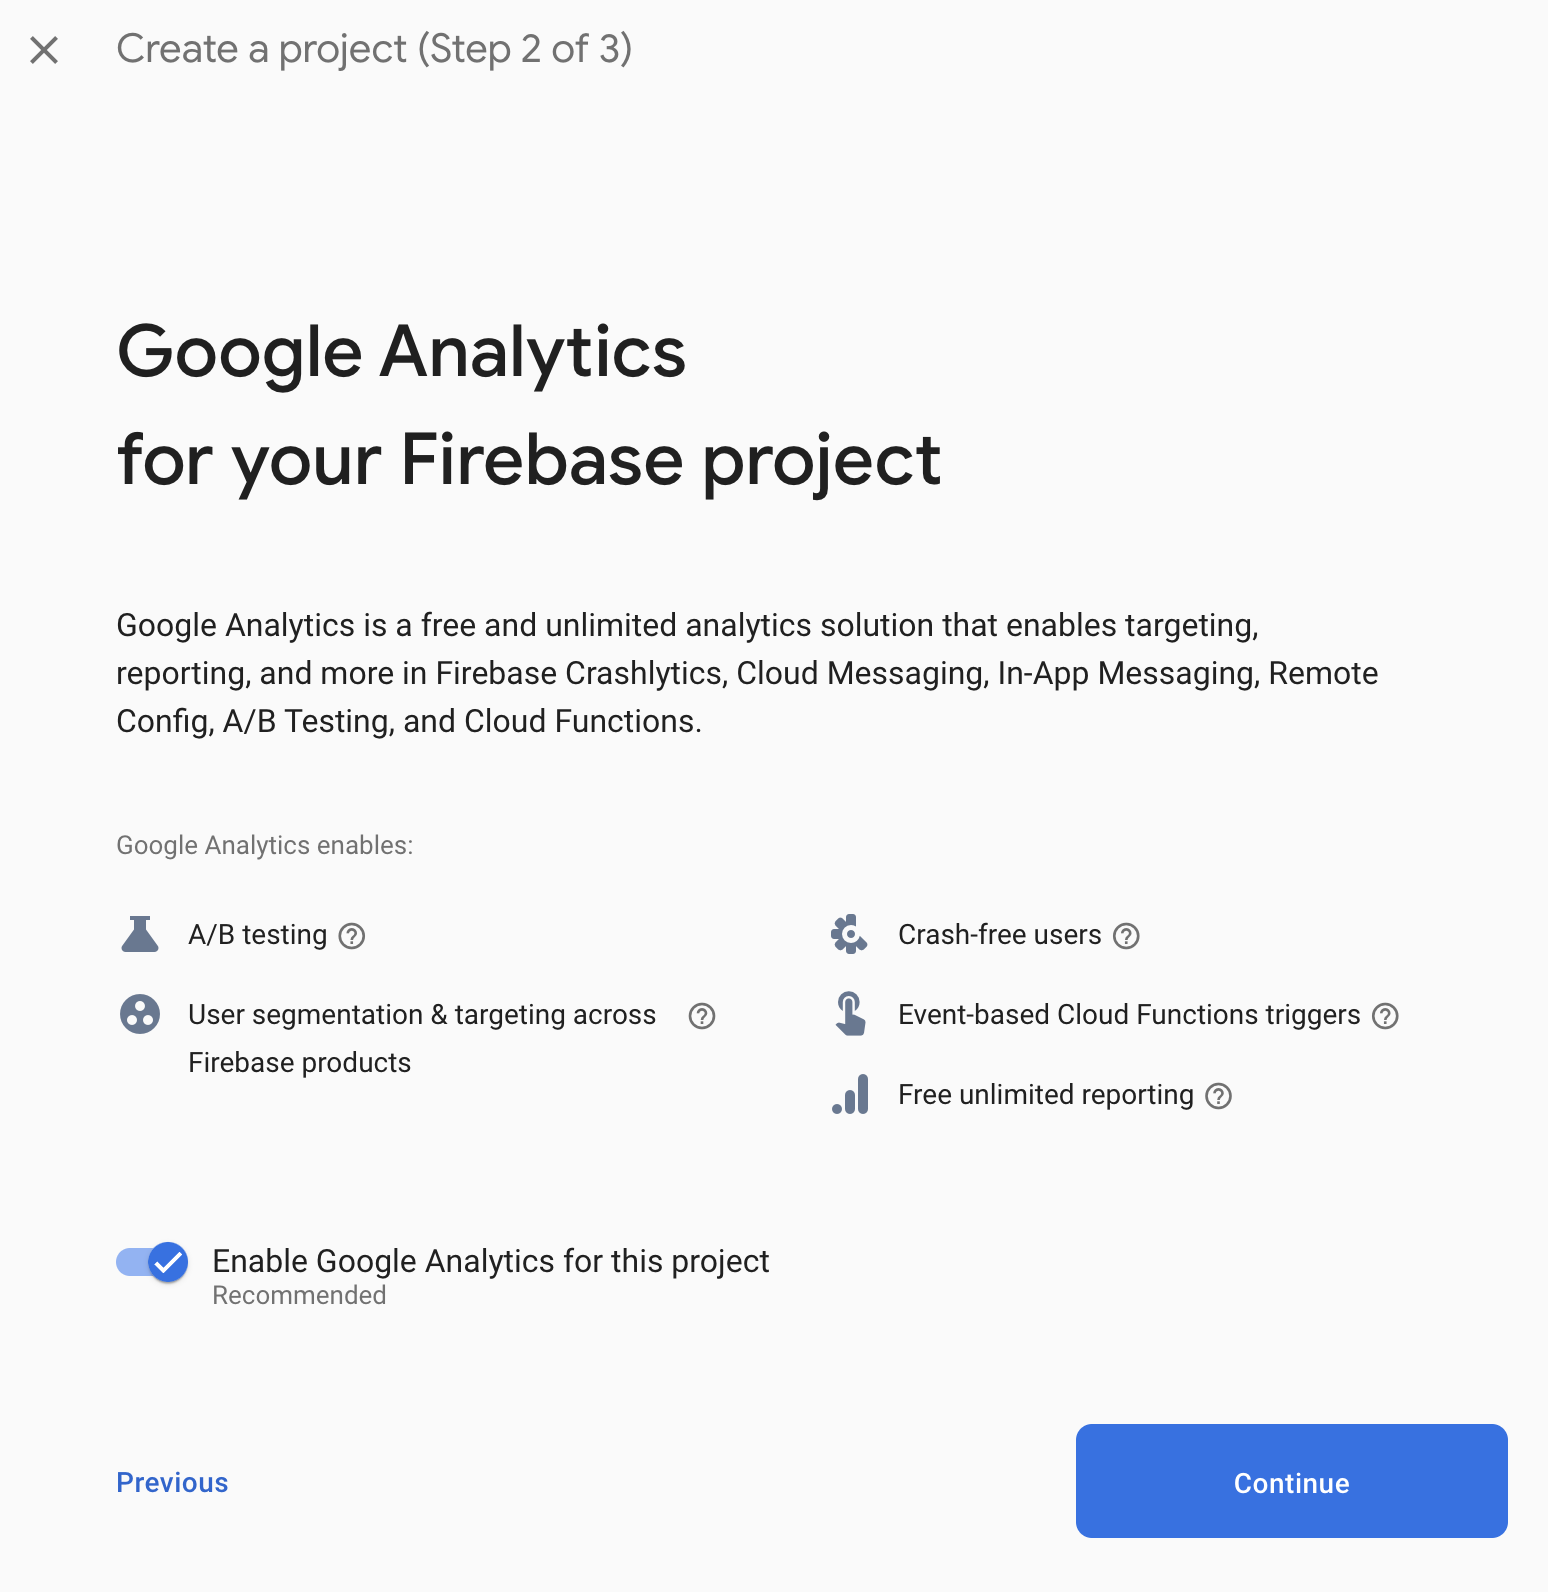
Select the Analytics account, and press Create Project:

Configure your Firebase project

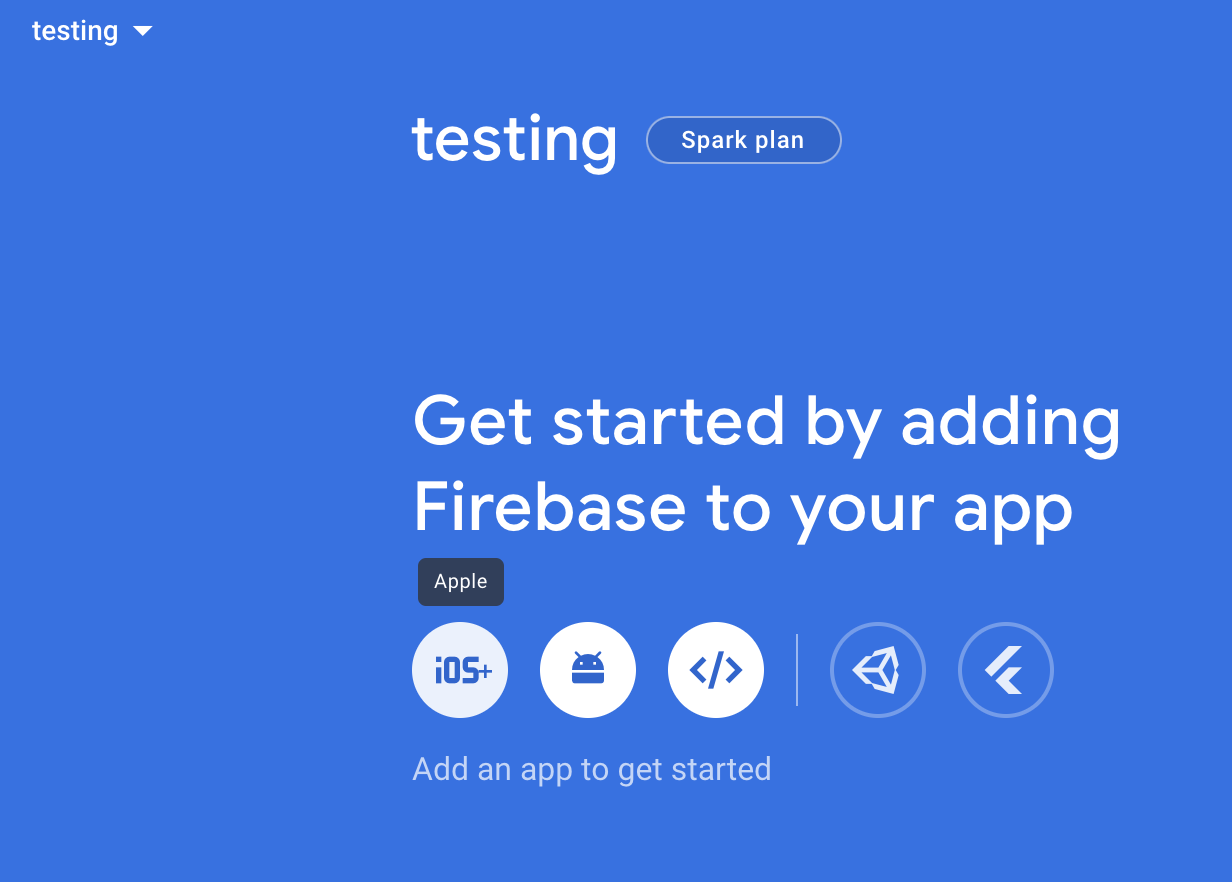
Once the project is created, select it from the dashboard if you aren’t already on the project page.

Now, select the iOS option from “Get started by adding Firebase to your app” page.

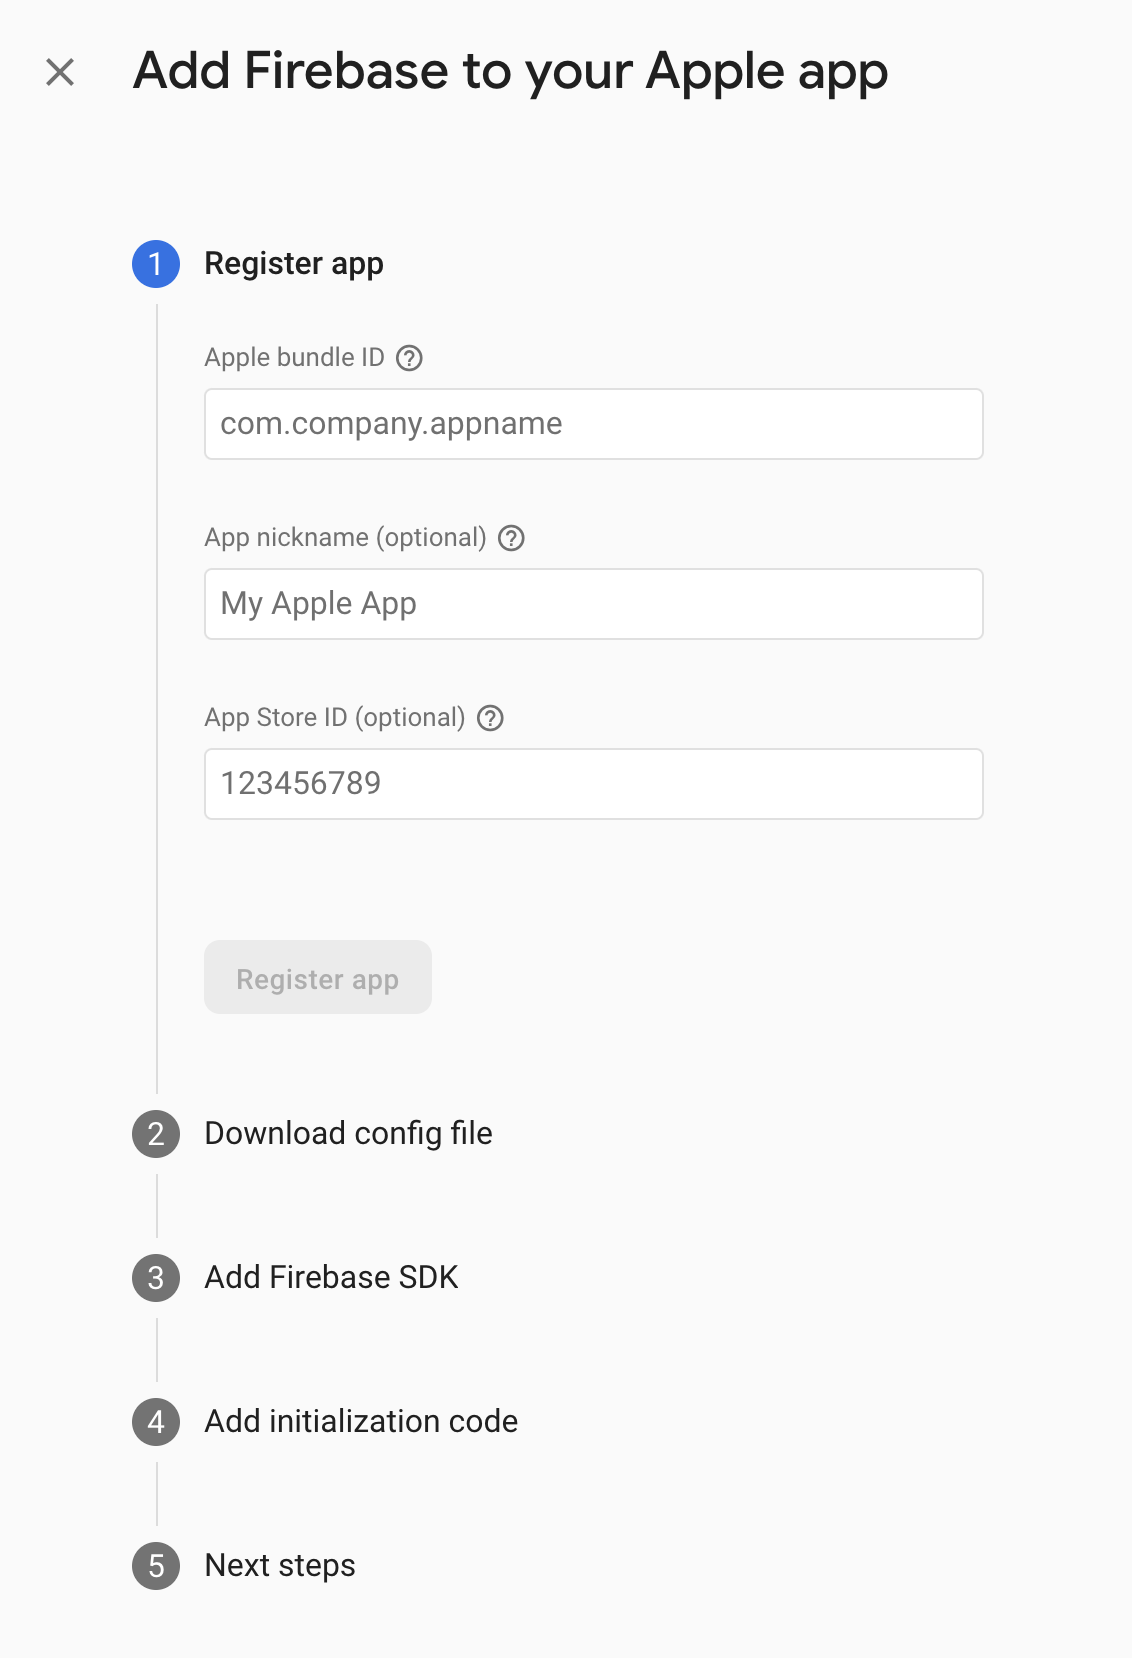
There are several steps on the page, but you only need to do the first couple.

Register your app

You can find your Bundle ID in the bundleIdentifier field of the app.json

Download the GoogleService-Info.plist file

Put the file in the root directory of your project. This should probably not be checked into Git, but I don’t think it is too critical.

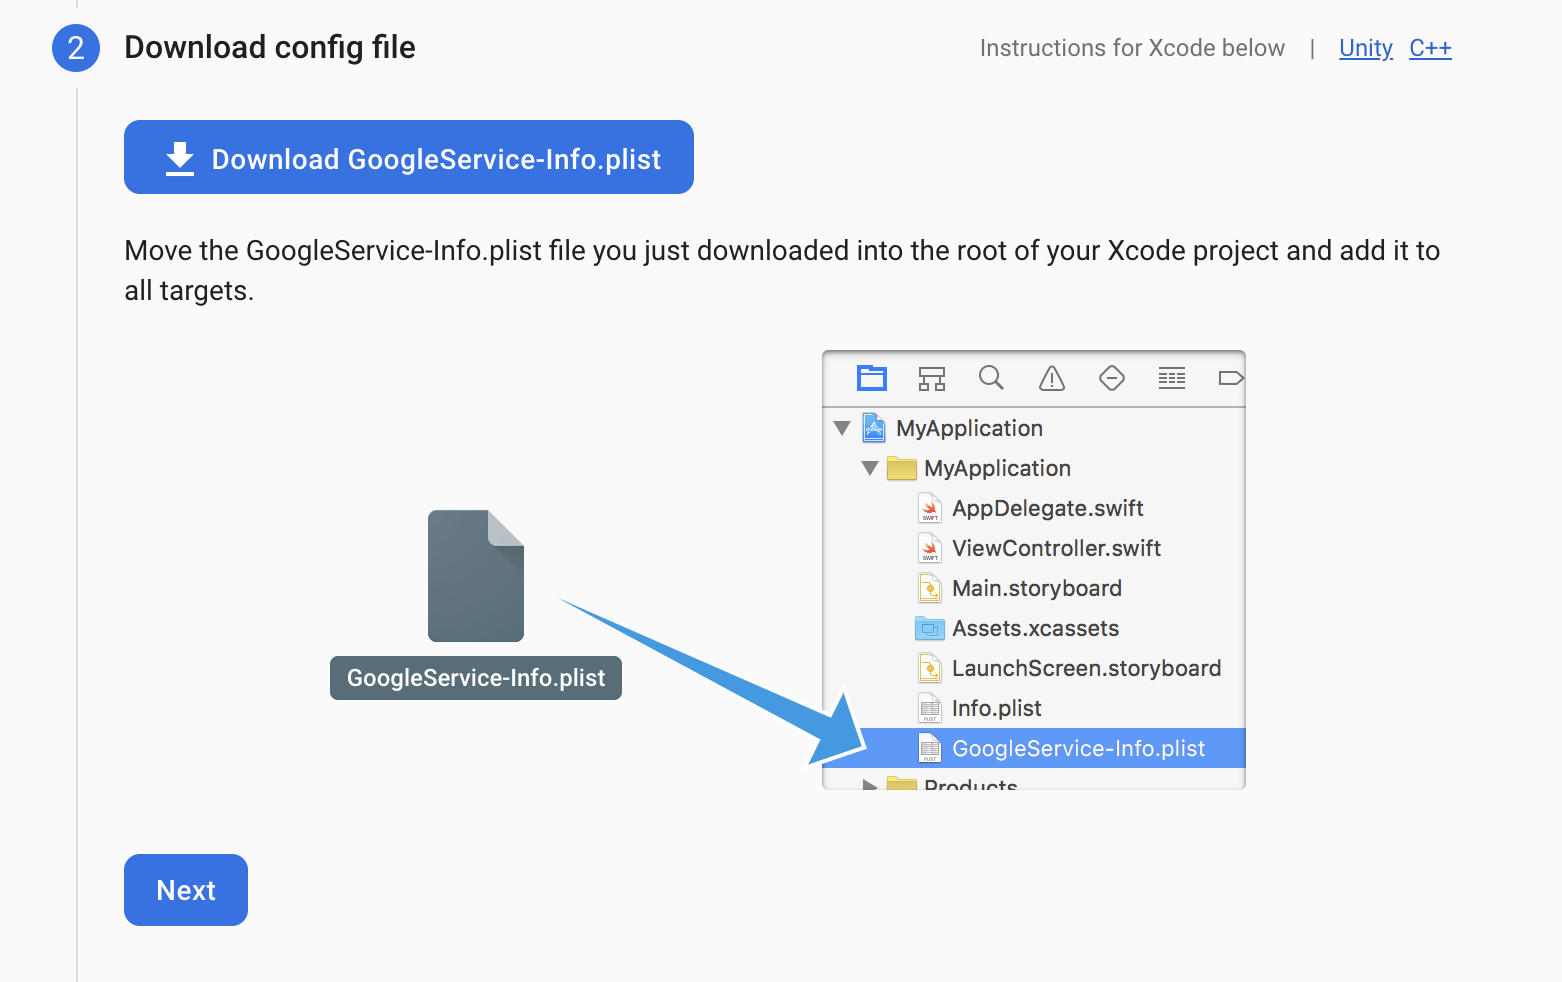
You can skip the rest of the steps on the page (SDK, initialization)

App Configuration

You need to add a couple of items to your app.json file.

"ios": {
      <...other setup if present>
      "googleServicesFile": "./GoogleService-Info.plist"
},
"plugins": [
      <...other setup if present>
      "@react-native-firebase/app",
      "@react-native-firebase/perf",
      "@react-native-firebase/crashlytics",
      [
          "expo-build-properties",
          {
              "ios": {
              "useFrameworks": "static"
              }
          }
      ]
],

Calling Firebase from React Native code

Expo Go cannot load @react-native-firebase/analytics, so create a wrapper file that will conditionally load it if we aren’t running the app in Expo Go. The code below includes a function logLevelComplete, that takes two parameters: level and moves, and logs a custom event called level_complete.

import Constants, { ExecutionEnvironment } from 'expo-constants'

// `true` when running in Expo Go.
const isExpoGo = Constants.executionEnvironment === ExecutionEnvironment.StoreClient

let analytics
if (!isExpoGo) {
  // eslint-disable-next-line @typescript-eslint/no-var-requires
  analytics = require('@react-native-firebase/analytics').default
}

export async function logLevelComplete(level: number, moves: number) {
  if (isExpoGo) {
    console.log(
      'levelComplete analytics event, level: ',
      level,
      'moves: ',
      moves
    )
  } else {
    await analytics().logEvent('level_complete', { level: level, moves: moves })
  }
}

Now, you can log events by calling the functions you create in firebaseWrapper.ts. If you are running in Expo Go, it will log the event to the console, if you are running the app through an eas build, it will send the Firebase events to Firebase.

Running in Expo Go with the simulator

Prior to Expo 49

You can run Expo Go as you normally would, but you will see a warning in your logs that indicates the build is not installed in your simulator, you can ignore this warning.

The expo-dev-client package is installed, but a development build is not installed on iPhone 12 mini.
Launching in Expo Go. If you want to use a development build, you need to create and install one first.
Learn more

Expo 49

In Expo 49, npx expo start will default to development builds rather than Expo Go if expo-dev-client is installed.

To force Expo Go to be used, launch with: npx expo start --go --clear

If you don’t, you will get an error like the one below, and the app won’t launch. You can also switch to Go by pressing s:

› Opening on iOS...
CommandError: No development build (<appname>) for this project is installed. Please make and install a development build on the device first.
Learn more

If you want to run the application natively, and not through Expo Go, I think you will need to build a preview version of the app through the eas command. This takes a while to compile, and doesn’t work for my workflow. I believe these instructions will help you get that set up, but I haven’t tried it: https://docs.expo.dev/develop/development-builds/create-a-build/#create-a-build-for-emulatorsimulator

Running on your device

To test that the Firebase integration is working, create an eas preview build, with a command like:
eas build --profile preview --platform ios --clear-cache

Once the build is done, install it on your device. Within your app, do whatever action will trigger the event call you set up.

If you go to the Firebase dashboard, you should see a count in the Users in last 30 minutes section after a minute or two.

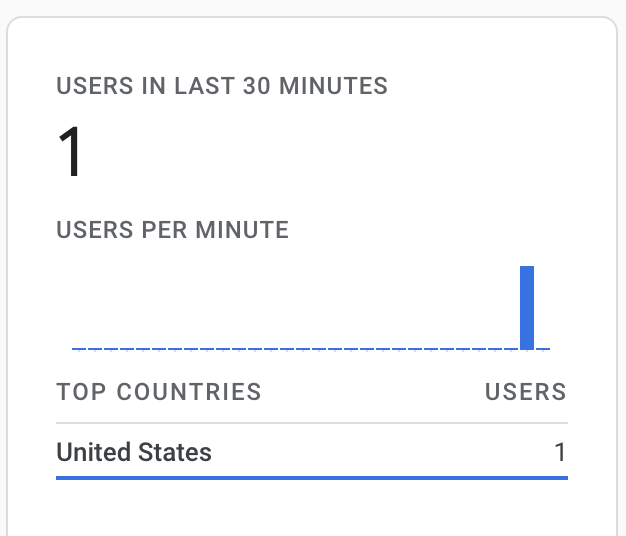
The events take up to 24 hours to show up in Firebase, so be patient.

References

Expo installation guide: https://docs.expo.dev/guides/using-firebase/#using-react-native-firebase

Firebase setup guide: https://rnfirebase.io/#managed-workflow

Firebase console: https://console.firebase.google.com/u/0/

Using hooks and context with SQLite for Expo in React Native

In this post, I discuss how I have set up SQLite in my Expo app. I utilize hooks and functional components to make my code reusable and modular.

I really like this post, which goes into great detail about using SQLite in a non-Expo setting: https://brucelefebvre.com/blog/2020/05/03/react-native-offline-first-db-with-sqlite-hooks/

This post assumes you have a working Expo React Native project, and that you are somewhat familiar with contexts, hooks, and state in React Native. I will show code that will manage a list of users, using a database, hooks with state, and a context.

To do the initial setup for SQLite, run:

expo install expo-sqlite

Overview

  1. Set up file for all of the DB queries
  2. Set up a hook to initialize the database
  3. Set up a context for managing users
  4. Use the context in components

Set up DB Queries

I like to keep my queries in a single file, this way, if I ever want to move off of SQLite, or mock out the DB for tests, I can swap out a single file.

Below is my code that will create our db tables, initialize the users db, get users, insert users. In addition, there is function to drop the db tables, which is helpful during development and test.

import React from 'react'

import * as SQLite from "expo-sqlite"

const db = SQLite.openDatabase('db.db')

const getUsers = (setUserFunc) => {
  db.transaction(
    tx => {
      tx.executeSql(
        'select * from users',
        [],
        (_, { rows: { _array } }) => {
          setUserFunc(_array)
        }
      );
    },
    (t, error) => { console.log("db error load users"); console.log(error) },
    (_t, _success) => { console.log("loaded users")}
  );
}

const insertUser = (userName, successFunc) => {
  db.transaction( tx => {
      tx.executeSql( 'insert into users (name) values (?)', [userName] );
    },
    (t, error) => { console.log("db error insertUser"); console.log(error);},
    (t, success) => { successFunc() }
  )
}

const dropDatabaseTablesAsync = async () => {
  return new Promise((resolve, reject) => {
    db.transaction(tx => {
      tx.executeSql(
        'drop table users',
        [],
        (_, result) => { resolve(result) },
        (_, error) => { console.log("error dropping users table"); reject(error)
        }
      )
    })
  })
}

const setupDatabaseAsync = async () => {
  return new Promise((resolve, reject) => {
    db.transaction(tx => {
        tx.executeSql(
          'create table if not exists users (id integer primary key not null, name text);'
        );
      },
      (_, error) => { console.log("db error creating tables"); console.log(error); reject(error) },
      (_, success) => { resolve(success)}
    )
  })
}

const setupUsersAsync = async () => {
  return new Promise((resolve, _reject) => {
    db.transaction( tx => {
        tx.executeSql( 'insert into users (id, name) values (?,?)', [1, "john"] );
      },
      (t, error) => { console.log("db error insertUser"); console.log(error); resolve() },
      (t, success) => { resolve(success)}
    )
  })
}

export const database = {
  getUsers,
  insertUser,
  setupDatabaseAsync,
  setupUsersAsync,
  dropDatabaseTablesAsync,
}

Some things to note about the code

  1. const db = SQLite.openDatabase('db.db') opens the database named db.db.
  2. The dropDatabaseTablesAsync, setupDatabaseAsync, and setupUsersAsync are asynchronous functions that return a promise. This means that we can call those functions with await. We will call these functions while showing the splash screen, waiting for the tasks to be finished before we move on.
  3. The last 2 parameters of the db.transaction are the error and success functions, which are called when the transaction is complete. We use the promise resolve and reject functions here. I found this article helpful: https://medium.com/@theflyingmantis/async-await-react-promise-testing-a0d454b5461b
  4. The other functions aren’t asynchronous because we don’t really need to wait for them to finish.
  5. For getUsers, we pass in a function that takes the array that the query returns as its parameter. We will pass in a function that can take the users from the query and set the state.
  6. For insertUser, we pass in a successFunc that will be called after the insert has happened. In our case, we are passing in the function to refresh the users from the database. This way we know that our state will reflect what is in the database.
  7. At the bottom of the file, we are exporting the functions so we can use them in other components.

The useDatabase Hook

When the app starts up, we want to set up the database tables if they haven’t already been setup, and insert some initial data. When working in dev, we may want to drop the existing tables to start clean, so we include a function call for that, which we can comment out in prod.

Here is the code, we put this file in the hooks directory. Hooks are a convenient location for code that can be called from functional components.

// force the state to clear with fast refresh in Expo
// @refresh reset
import React, {useEffect} from 'react';

import {database} from '../components/database'

export default function useDatabase() {
  const [isDBLoadingComplete, setDBLoadingComplete] = React.useState(false);

  useEffect(() => {
    async function loadDataAsync() {
      try {
        await database.dropDatabaseTablesAsync()
        await database.setupDatabaseAsync()
        await database.setupUsersAsync()

        setDBLoadingComplete(true);
      } catch (e) {
        console.warn(e);
      }
    }

    loadDataAsync();
  }, []);

  return isDBLoadingComplete;
}

Some notes on this code:

  1. The component manages its own state (isDBLoadingComplete) to indicate when the database loading is complete.
  2. We put the code within the useEffect function so that it is called when the component is loaded. By including the [] as the second parameter, we only call this function on the initial render.
  3. The await calls will run in order, and will only move on to the next line when the function has returned.
  4. After all of the database setup functions are called and have returned, we will set the state to indicate that the loading is complete. We will be watching for this state value in the App.js to know when we can hide the splash screen and show the homescreen.
  5. The // @refresh reset comment will force the state to be cleared when the app refreshes in Expo.

Initializing the Database

We only want to initialize the database when the application first starts, and since the app can’t really work without the database, we should show the splash screen until the initialization is done. We can do this in the App.js file.

Since the useEffect function within useDatabase is asynchronous, we can’t guarantee that it will return right away. We set it up to track a state flag indicating when it is done, so the code in our App.js will watch for that flag.

Here is the relevant code in the App.js.

import React from 'react';
import { View } from 'react-native';

import * as SplashScreen from 'expo-splash-screen';

import useDatabase from './hooks/useDatabase'
import useCachedResources from './hooks/useCachedResources';

export default function App(props) {
  SplashScreen.preventAutoHideAsync(); //don't let the splash screen hide

  const isLoadingComplete = useCachedResources();
  const isDBLoadingComplete = useDatabase();

  if (isLoadingComplete && isDBLoadingComplete) {
    SplashScreen.hideAsync();

    return (
      <View>
        ...Render the app stuff here...
      </View>
    );
  } else {
    return null;
  }
}

Some notes in the code

  1. Notice we hide the splash screen with SplashScreen.hideAsync() only when both loading flags are true.
  2. The useCachedResources is part of the Expo boilerplate.
  3. The App may return null a few times before the database and cached resources are done loading.

Context for user data

The app will need to have access the user data from multiple screens.

In the example code, we have 2 tabs:

  • HomeScreen – showing the list of users, with an input field to add users.
  • UserListScreen – showing the list of users

Both tabs need to be updated with the new user list when a user is inserted. To do this, we can store the user data and functions in a context: https://reactjs.org/docs/context.html

Contexts shouldn’t be used for all data, but if you need to share data across many components, sometimes deeply nested, it might be a good solution.

The code below was inspired by this post: https://www.codementor.io/@sambhavgore/an-example-use-context-and-hooks-to-share-state-between-different-components-sgop6lnrd

// force the state to clear with fast refresh in Expo
// @refresh reset

import React, { useEffect, createContext, useState } from 'react';
import {database} from '../components/database'

export const UsersContext = createContext({});

export const UsersContextProvider = props => {
  // Initial values are obtained from the props
  const {
    users: initialUsers,
    children
  } = props;

  // Use State to store the values
  const [users, setUsers] = useState(initialUsers);

  useEffect(() => {
    refreshUsers()
  }, [] )

  const addNewUser = userName => {
    return database.insertUser(userName, refreshUsers)
  };

  const refreshUsers = () =>  {
    return database.getUsers(setUsers)
  }

  // Make the context object:
  const usersContext = {
    users,
    addNewUser
  };

  // pass the value in provider and return
  return <UsersContext.Provider value={usersContext}>{children}</UsersContext.Provider>;
};

Some notes on the code

  1. This will create the Context and Provider. We could have also created a Consumer, but since we are using the useContext function, we don’t need it.
  2. Within the addNewUser and refreshUsers functions, we are making our database calls.
    1. In refreshUsers we are sending the setUsers function, which will allow the query to set our local state.
    2. In addNewUser we are sending the refreshUsers function to refresh our state from the database.
  3. We have a useEffect call to instantiate the users list from the database. We only call this function on the first render.
  4. We are set up to take an initial state through props when we create the UsersContextProvider, but those values are quickly overwritten with the useEffect call. I left the code here for reference.

Setting up the Provider

In order to make the context available to the HomeScreen and UserListScreen, we need to wrap a common parent component in the context Provider. This will be done in the App.js.

import {UsersContextProvider} from './context/UsersContext'
.
.
.
<UsersContextProvider>
  < parent of HomeScreen and UserListScreen components goes here>
</UsersContextProvider>

Here is the complete App.js file, which is mostly boilerplate from initializing the Expo app.

import { NavigationContainer } from '@react-navigation/native';
import { createStackNavigator } from '@react-navigation/stack';
import React from 'react';
import { Platform, StatusBar, StyleSheet, View } from 'react-native';

import * as SplashScreen from 'expo-splash-screen';

import useDatabase from './hooks/useDatabase'
import useCachedResources from './hooks/useCachedResources';

import {UsersContextProvider} from './context/UsersContext'

import BottomTabNavigator from './navigation/BottomTabNavigator';
import LinkingConfiguration from './navigation/LinkingConfiguration';

const Stack = createStackNavigator();

export default function App(props) {
  SplashScreen.preventAutoHideAsync();

  const isLoadingComplete = useCachedResources();
  const isDBLoadingComplete = useDatabase();

  if (isLoadingComplete && isDBLoadingComplete) {
    SplashScreen.hideAsync();

    return (
      <View style={styles.container}>
        {Platform.OS === 'ios' && <StatusBar barStyle="dark-content" />}
        <UsersContextProvider>
          <NavigationContainer linking={LinkingConfiguration} >
            <Stack.Navigator>
              <Stack.Screen name="Root" component={BottomTabNavigator} />
            </Stack.Navigator>
          </NavigationContainer>
        </UsersContextProvider>
      </View>
    );
  } else {
    return null;
  }
}

const styles = StyleSheet.create({
  container: {
    flex: 1,
    backgroundColor: '#fff',
  }
});

Accessing the context from a component

To access the context, we use the useContext function, passing in our desired context. In the case of the UserListScreen.js, we just need the users, which we then render within our return call.

import React, {useContext} from 'react';
import {StyleSheet, Text} from 'react-native';
import { ScrollView } from 'react-native-gesture-handler';

import {UsersContext } from '../context/UsersContext'

export default function UserListScreen() {
  const { users } = useContext(UsersContext)

  return (
    <ScrollView style={styles.container}>
      <Text>Here is our list of users</Text>
      {users.map((user) => (
        <Text key={user.id}>{user.name}</Text>
      ))}
    </ScrollView>
  );
}

const styles = StyleSheet.create({
  container: {
    flex: 1,
    backgroundColor: '#fafafa',
  },
});

We do something similar in the HomeScreen.js, but we also import the function to add a new name: addNewUser.

import React, {useState, useContext} from 'react';
import { StyleSheet, Button, Text, TextInput, View } from 'react-native';

import {UsersContext} from '../context/UsersContext'

export default function HomeScreen() {
  const [ name, setName ] = useState(null);

  const usersContext = useContext(UsersContext)
  const { users, addNewUser } = usersContext;

  const insertUser = () => {
    addNewUser(name)
  }

  return (
    <View style={styles.container}>
      <Text>Our list of users</Text>
      {users.map((user) => (
        <Text key={user.id}>{user.name}</Text>
      ))}

      <TextInput
        style= { styles.input }
        onChangeText={(name) => setName(name)}
        value={name}
        placeholder="enter new name..."
      />
      <Button title="insert user" onPress={insertUser}/>
    </View>
  );
}

HomeScreen.navigationOptions = {
  header: null,
};

const styles = StyleSheet.create({
  input: {
    margin: 15,
    padding: 10,
    height: 40,
    borderColor: '#7a42f4',
    borderWidth: 1,
  },
  container: {
    flex: 1,
    backgroundColor: '#fff',
  },
});

Conclusion

I think this set up will allow me to easily re-use the database related code, without much overhead in each component that needs the data.

I am not certain that having the users and the functions to set the uses in a context is the best approach, but it seems appropriate for my small use case.

Using Rectangles to Fill the Area Outside of a Circle

Introduction

I am trying to create a series of rectangles to fill the area outside of a circle. I am doing this to solve a problem I ran into building a simple React Native app: Hashmarks

Here is a post explaining that problem: Round Buttons in React Native

In the image below, I am trying to fill the orange area with rectangles.

Area outside of a circle

We will focus on the top left quadrant of the circle, but similar logic can be applied to the whole circle.

To fill the yellow corner area in the image on the left, we can fill the space with a series of rectangles to approximate the area, like in the image on the right.

Find x and y coordinates along a curve

I would like to know the coordinates of each corner of each rectangle. The coordinates along the Y-axis are straight forward, but the coordinates along the curve will need some calculation.

We can use the Pythagorean Theorem, from geometry, to determine the coordinates for the curve side of each rectangle. The Pythagorean Theorem states that given the length of 2 sides of a right triangle, we can determine the length of the third side.
As an equation, this is: a2 + b2 = c2

When applied to a circle, c is our radius, so the equation can be rewritten as: a2 + b2 = r2

Pythagorean Theorem applied to a circle

In the image below, we can use the length of a to be the y coordinate. If we calculate the length of b, we can determine the x coordinate by subtracting b from the radius. In the drawing below, let’s calculate the x coordinate along the curve for when y is 7.

Plug the values into the equation and solve for b:
a2 + b2 = r2
72 + b2 = 102
b2 = 102 – 72
b = √(102 – 72)
b = √(100 – 49)
b = √51
b = 7.14

b is 7.14 units long

Since we are filling the area outside of the circle, we need to do a bit of math to get the x coordinate. Since we know our radius is 10, we just subtract 7.14 from 10, which is 2.86. In the image below, that looks about right, the intersection of a and r is at about (2.86, 7).

Solving for x, our equation is:
x = radius - √(radius2 - y2)

Determine the coordinates of all corners of the rectangles

Now that we know how to determine an x coordinate given our y coordinate, let’s translate that into rectangles. To get the rectangle coordinates, we need to know the height dimension of the rectangles. In our case, each rectangle is 1 unit high. We can calculate this with radius / desired number of rectangles. In the image below, the rectangles that correspond to y = 0, y = 1, and y = 3 were so small, I excluded them.

Let’s calculate the coordinates for the corners of the blue bar. By reading the dots on graph, we can determine most of the values:


Bottom Left:  (0,7)
Bottom Right: (?,7)
Top Left:     (0,8)
Top Right:    (?,8)

We can use the math we did above to determine our unknown values. Since the entire right side of the rectangle has the same x value, we can use the 2.86 for both corners.


Bottom Left:  (0,7)
Bottom Right: (2.86,7)
Top Left:     (0,8)
Top Right:    (2.86,8)

For the rectangle directly above the blue one:


Bottom Left:  (0,8)
Bottom Right: (?,8)
Top Left:     (0,9)
Top Right:    (?,9)

Solving for x in our equation, when y = 8: x = radius - √(radius2 - y2)

x = 10 – √(100 – 82)
x = 10 – √(36)
x = 10 – 6
x = 4

Our updated coordinates are:


Bottom Left:  (0,8)
Bottom Right: (4,8)
Top Left:     (0,9)
Top Right:    (4,9)

Which looks about right:

Gradient Border on Circular Button in React Native

Introduction

I will walk through adding a gradient border to a circular button in React Native. Here is a post on how to create a round button: Round Buttons in React Native

The final code will create a button that looks like this:

React Native circular button with gradient border.
React Native circular button with gradient border

Features

  • Dynamic border based on circle radius
  • Dynamic border with color gradient as a prop
  • Gradient is displayed over full button on click.

Walkthrough

Create a simple round button

As a starting point, here is code to create a round button:


import React from 'react';
import {View, StyleSheet, TouchableOpacity } from 'react-native';

export default class CircleButton extends React.Component {
  render(){
    let localStyles = styles(this.props)

    return (
      <View style={localStyles.container}>
        <TouchableOpacity
          activeOpacity={.8}
          style = {localStyles.button}
          onPress = {this.props.onPress}
        >
          {this.props.children}
        </TouchableOpacity>
      </View>
    )
  }
}

const styles = (props) => StyleSheet.create({
  container: {
    position: 'relative',
    zIndex: 0,
  },
  button: {
    backgroundColor: 'white',
    justifyContent: 'center',
    alignContent: 'center',
    borderWidth: 3,
    borderRadius: (props.circleDiameter / 2),
    width: props.circleDiameter,
    height: props.circleDiameter,
  },
});

And here is how to call it

//...other code

<CircleButton
  onPress = {() => props.addScore(1)}
  circleDiameter = {300}
>
  <Image source={ require('../assets/images/plus-1.png') }/>
</CircleButton>

//...other code

This code will generate a button that looks like this:

Circular button in React Native

Add gradient border

We will create 2 circles, one on top of the other. The background circle will be slightly larger and have the gradient applied. The circle in the foreground will be a solid color that will overlap the gradient one, except for on the edges, allowing the gradient to show through. Below is what the background circle looks like.

background circle

A couple of notes on the code

  • <LinearGradient> will apply the gradient, it is available in the expo-linear-gradient module. I haven’t tried it, but it appears you can use this module without Expo. Documentation can be found here: LinearGradient
  • The start and end props of the LinearGradient specify the angle of the gradient.
  • The colors specify the different colors to use, I like how 3 looks.
  • The size of the border is based on a ratio, and set in the gradientRatio function. I just played around with values to get something that I thought looked good.
  • We will reduce the size of the solid color circle based on the gradientRatio.
  • We remove the borderWidth from the button style because technically the button has no border now.
  • The margin of the solid color circle is equal to the half of the difference in circle sizes. This splits the size difference on all sides to center the circle.

import React from 'react';
import {View, StyleSheet, TouchableOpacity } from 'react-native';

import { LinearGradient } from "expo-linear-gradient";

export default class CircleButton extends React.Component {
  render(){
    let localStyles = styles(this.props)

    return (
      <View style={localStyles.container}>

        <LinearGradient
          start={[1, 0.5]}
          end={[0, 0]}
          colors={this.props.gradientColors}
          style={localStyles.linearGradient}
        >
          <TouchableOpacity
            activeOpacity={.8}
            style = {localStyles.button}
            onPress = {this.props.onPress}
          >
            {this.props.children}
          </TouchableOpacity>
        </LinearGradient>
      </View>
    )
  }
}

const gradientMargin = (circleDiameter) => {
  const ratio = (1 - gradientRatio(circleDiameter)) / 2

  return circleDiameter * ratio
}

const gradientRatio = (circleDiameter) => {
  if(circleDiameter < 100){
    return 0.88
  }else{
    return 0.96
  }
}

const styles = (props) => StyleSheet.create({
  container: {
    position: 'relative',
    zIndex: 0,
  },
  linearGradient: {
    borderRadius: props.circleDiameter / 2,
    width: props.circleDiameter,
    height: props.circleDiameter,
  },
  button: {
    margin: gradientMargin(props.circleDiameter),
    backgroundColor: 'white',
    justifyContent: 'center',
    alignContent: 'center',
    borderRadius: (props.circleDiameter / 2) * gradientRatio(props.circleDiameter),
    width: props.circleDiameter * gradientRatio(props.circleDiameter),
    height: props.circleDiameter * gradientRatio(props.circleDiameter),
  },
});

Now add the gradient prop to where we include the <CircleButton>

//...other code

<CircleButton
  onPress = {() => props.addScore(1)}
  circleDiameter = {300}
  gradientColors = {['#18acbb', '#e8ffe6', '#4abb0b']}
>
  <Image source={ require('../assets/images/plus-1.png') } />
</CircleButton>

//...other code

The resulting button looks like this:

Circle Button with Gradient Border


Round Buttons in React Native

Introduction

I built a simple React Native application that includes round buttons. The design includes 1 large round button and 2 smaller ones nested in the corners.

Button layout

I ran into an issue where the corners of the containing element respond to clicks, even though it is outside of the circle.

In this post, I walk through creating a circular button where the corners don’t respond to clicks.

TLDR: You can jump to my final solution near the bottom of the page, here.

Problem – The corners can be clicked

My first iteration of the circular button looked fine, but the TouchableOpacity element is a square, and the corners outside of the circle were still clickable. This is fine in smaller buttons where the entire element is a reasonable touch target, but in bigger buttons, the corner areas can be quite large.

As an example, the button below will register clicks in both the blue and orange areas. Ideally, only the blue area would register clicks.

This issue is compounded in my case because I am nesting additional buttons in the corners. This overlap will register big button clicks, when small button clicks are intended.

Solution

  1. Create simple circle button
  2. Add masking for the corners to prevent clicking
  3. Final code

1) Create a simple circle button

To start, we create a simple circular button that uses a TouchableOpacity element to register the touches. It will look like this:

The key to making the button round is to include a border radius that is at least 50% of the width and height.

To make it simple, I am passing in a circleDiameter prop that is used to calculate the height, width, and borderRadius. In order for the props to be used in the styles, we need to pass them into the styles as a parameter. I do this through the localStyles variable.

Here is the code for a simple circular button:


import React from 'react';
import { View, StyleSheet, TouchableOpacity } from 'react-native';

export default class SimpleCircleButton extends React.Component {
  render(){
    let localStyles = styles(this.props) //need to load styles with props because the styles rely on prop values

    return (
      <View style={localStyles.container}>
        <TouchableOpacity
          activeOpacity={.8} //The opacity of the button when it is pressed
          style = {localStyles.button}
          onPress = {this.props.onPress}
        >
          {this.props.children}
        </TouchableOpacity>
      </View>
    )
  }
}

const styles = (props) => StyleSheet.create({
  container: {
    position: 'relative',
    zIndex: 0,
    backgroundColor: 'rgba(255,95,28,0.42)', //add a background to highlight the touchable area
  },
  button: {
    backgroundColor: 'rgba(20,174,255,0.51)',
    justifyContent: 'center',
    alignContent: 'center',
    borderWidth: 3,
    borderRadius: (props.circleDiameter / 2),
    width: props.circleDiameter,
    height: props.circleDiameter,
  },
});

We can then add the circle like this:

//...Other code above

// The `onPress` function will be called when the button is pressed
// The content of the <SimpleCircleButton> will be displayed in the button, in our case, an image that shows "+1".
<SimpleCircleButton
  onPress = {() => props.addScore(1)}
  circleDiameter = {300}
>
  <Image source={ require('../assets/images/plus-1.png') } />
</SimpleCircleButton>

//...Other code below

Using the code above, we get a button like the image below, where the orange and blue areas are clickable. Next we will make the orange area not clickable.

Round react native button. Orange area is still clickable.

2) Create corner masking

First, we will focus on the top left quadrant of the circle.

To prevent clicking in the orange corner area, we can fill the space with non-clickable elements the have a higher z-index (ios) or elevation (android). We can use a series of rectangles to approximate the area, like in the images below.

We can use the Pythagorean Theorem to calculate the width of each rectangle. Here is a post on how that math works: Using Rectangles to Fill the Area Outside of a Circle.

This is the equation we can use to calculate the width: width = radius - √(radius2 - height2)

Convert our equation to code

Now let’s update the SimpleCircleButton to include masking rectangles. We will start with 7 rectangles to keep it simple, but we will add more later. The more rectangles we have, the smaller the height of each one, which fits closer to the circle. However, we don’t want to hinder performance by adding too many. I used 13 in my app.


import React from 'react';
import { View, StyleSheet, TouchableOpacity } from 'react-native';

export default class SimpleCircleButton extends React.Component {
  constructor(props) {
    super(props)

    this.numberOfRectangles = 7

    // The style used for the rectangles
    // the zIndex and elevation of 10 puts the rectangles in front of the clickable button
    this.baseRectangleStyle = {
      position: 'absolute',
      zIndex: 10,
      elevation: 10,
    }
  }

  fillRectangle = (iteration) => {
    // The radius of a circle is the diameter divided by two
    const radius = this.props.circleDiameter / 2

    // base the height of each bar on the circle radius.
    // Since we are doing 1 quadrant at a time, we can just use the radius as the total height
    // Add 1 to the value b/c we will subtract one down below to get rid of the zero index
    const barHeight = radius / (this.numberOfRectangles + 1)

    // round the radius up, so get rid of fractional units
    const roundedRadius = Math.ceil(radius)

    // The y value is the height of our bars, * the number of bars we have already included
    const y = (barHeight * iteration)

    // here is where we apply our modified Pythagorean equation to get our x coordinate.
    const x = Math.ceil(Math.sqrt(Math.pow(radius, 2) - Math.pow(y, 2)))

    // Now get the width of the bar based on the radius.
    let width = roundedRadius - x

    // The bar dimensions
    const size = {
      width: width,
      height: barHeight
    };

    // The bar location. Since we are starting with the top left, we need to add the radius to the y value
    let location = {
      left: 0,
      bottom: y + roundedRadius,
    };

    // Add some colors to the bars. In our final version we won't do this.
    let color = '#FF5F1C'
    if(iteration === 5){ color = '#1da1e6' }

    // Create a unique key to identify the element
    // let key = "" + iteration + starting + color
    let key = "" + iteration + color

    return(
      <View key={key} style={{...this.baseRectangleStyle, backgroundColor: color, ...size, ...location}}></View>
    )
  };

  renderLines = () => {
    //start with index+1 b/c 0 will be a width of zero, so no point in doing that math
    return [...Array(this.numberOfRectangles)].map((_, index) => this.fillRectangle(index+1))
  }

  fillRectangles = () => {
    return(
      <React.Fragment>
         {this.renderLines()}
      </React.Fragment>
     )
   };

  render(){
    let localStyles = styles(this.props)

    return (
      <View style={localStyles.container}>
        <TouchableOpacity
          activeOpacity={.8}
          style = {localStyles.button}
          onPress = {this.props.onPress}
        >
          {this.props.children}
        </TouchableOpacity>

        {this.fillRectangles()}
      </View>
    )
  }
}

const styles = (props) => StyleSheet.create({
  container: {
    position: 'relative',
    zIndex: 0,
  },
  button: {
    backgroundColor: 'rgba(20,174,255,0.31)',
    justifyContent: 'center',
    alignContent: 'center',
    borderRadius: (props.circleDiameter / 2),
    borderWidth: 3,
    width: props.circleDiameter,
    height: props.circleDiameter,
  },
});

Running our updated code looks like the image below. The colored bars are not clickable, but the round button is. The blue bar is for reference back to our original drawing of bars.

Add bars to other quadrants

Now add the other quadrants.

  • Increase the numberOfRectangles to 15 to get a bitter circle fit
  • Add code to the constructor to reduce the math we do for each quadrant * iteration combination
    • Move the radius
    • Create a new variable fillRectangleHeight
  • Add a starting parameter to the fillRectangle. This specifies the quadrant to be displayed.
  • Add a new set of if statements that will set the location styles, depending upon the quadrant.
  • Add starting to the unique key
  • Add starting parameter to renderLines to be passed through to fillRectangle.
  • Add new calls to renderLines for each quadrant.

import React from 'react';
import {View, StyleSheet, TouchableOpacity } from 'react-native';

export default class SimpleCircleButton extends React.Component {
  constructor(props) {
    super(props)

//CHANGE VALUE
    this.numberOfRectangles = 15 //Define how many rectangles we want

//START NEW CODE
    // The radius of a circle is the diameter divided by two
    this.radius = this.props.circleDiameter / 2

    // base the height of each bars on the circle radius.
    // Since we are doing 1 quadrant at a time, we can just use the radius as the total height
    // Add 1 to the value b/c we will subtract one down below to get rid of the zero index
    this.fillRectangleHeight = this.radius / (this.numberOfRectangles + 1)
//END NEW CODE

    // The style used for the rectangles
    // the zIndex and elevation of 10 puts the rectangles in front of the clickable button
    this.baseRectangleStyle = {
      position: 'absolute',
      zIndex: 10,
      elevation: 10,
    }
  }

// ADD a new `starting` parameter here to represent the quadrant we are working on
  fillRectangle = (iteration, starting) => {

//CODE REMOVED HERE

    const barHeight = this.fillRectangleHeight

    // round the radius up, so get rid of fractional units
    const roundedRadius = Math.ceil(this.radius)

    // The y value is the height of our bars, * the number of bars we have already included
    const y = (barHeight * iteration)

    // here is where we apply our modified Pythagorean equation to get our x coordinate.
    const x = Math.ceil(Math.sqrt(Math.pow(this.radius, 2) - Math.pow(y, 2)))

    // Now get the width of the bar based on the radius.
    let width = roundedRadius - x

    // The bar dimensions
    const size = {
      width: width,
      height: barHeight
    };

    // The bar location. Since we are starting from the middle, working out way out, we need to add the radius to y
// START NEW CODE - depending on the quadrant, change the location
    const verticalLocation = y + roundedRadius

    let location = {}
    if(starting === 'topLeft'){
      location = {
        left: 0,
        bottom: verticalLocation,
      };
    }else if(starting === 'bottomLeft'){
      location = {
        left: 0,
        top: verticalLocation,
      }
    }else if(starting === 'topRight'){
      location = {
        right: 0,
        top: verticalLocation,
      }
    }else if(starting === 'bottomRight'){
      location = {
        right: 0,
        bottom: verticalLocation,
      }
    };
//END NEW CODE

    // Add some colors to the bars. In our final version we won't do this.
    let color = '#FF5F1C'

    // Create a unique key to identify the element
    let key = "" + iteration + starting + color

    return(
      <View key={key} style={{...this.baseRectangleStyle, backgroundColor: color, ...size, ...location}}></View>
    )
  };

//START NEW CODE
  renderLines = (starting) => {
    //start with index+1 b/c 0 will be a width of zero, so no point in doing that math
    return [...Array(this.numberOfRectangles)].map((_, index) => this.fillRectangle(index+1, starting))
  }
//END NEW CODE

  fillRectangles = () => {
    return(
      <React.Fragment>
        {/*START NEW CODE*/}
        {this.renderLines('topLeft')}
        {this.renderLines('bottomLeft')}
        {this.renderLines('topRight')}
        {this.renderLines('bottomRight')}
        {/*END NEW CODE*/}
      </React.Fragment>
     )
   };

  render(){
    let localStyles = styles(this.props)

    return (
      <View style={localStyles.container}>
        <TouchableOpacity
          activeOpacity={.8}
          style = {localStyles.button}
          onPress = {this.props.onPress}
        >
          {this.props.children}
        </TouchableOpacity>

        {this.fillRectangles()}
      </View>
    )
  }
}

const styles = (props) => StyleSheet.create({
  container: {
    position: 'relative',
    zIndex: 0,
  },
  button: {
    backgroundColor: 'rgba(20,174,255,0.31)',
    justifyContent: 'center',
    alignContent: 'center',
    borderRadius: (props.circleDiameter / 2),
    borderWidth: 3,
    width: props.circleDiameter,
    height: props.circleDiameter,
  },
});

Running this new code results in the image below

All 4 quadrants filled in

TLDR: Final Code

Remove some comments and the bar coloring to clean up the code.


import React from 'react';
import {View, StyleSheet, TouchableOpacity } from 'react-native';

export default class SimpleCircleButton extends React.Component {
  constructor(props) {
    super(props)

    this.numberOfRectangles = 15
    this.radius = this.props.circleDiameter / 2

    // base the height of each bars on the circle radius.
    // Add 1 to the value b/c we will subtract one down below to get rid of the zero index
    this.fillRectangleHeight = this.radius / (this.numberOfRectangles + 1)

    // The style used for the rectangles
    // the zIndex and elevation of 10 puts the rectangles in front of the clickable button
    this.baseRectangleStyle = {
      position: 'absolute',
      zIndex: 10,
      elevation: 10,
    }
  }

  fillRectangle = (iteration, starting) => {
    const barHeight = this.fillRectangleHeight
    const roundedRadius = Math.ceil(this.radius)
    const y = (barHeight * iteration)

    const x = Math.ceil(Math.sqrt(Math.pow(this.radius, 2) - Math.pow(y, 2)))

    let width = roundedRadius - x

    // The bar dimensions
    const size = {
      width: width,
      height: barHeight
    };

    const verticalLocation = y + roundedRadius

    let location = {}
    if(starting === 'topLeft'){
      location = {
        left: 0,
        bottom: verticalLocation,
      };
    }else if(starting === 'bottomLeft'){
      location = {
        left: 0,
        top: verticalLocation,
      }
    }else if(starting === 'topRight'){
      location = {
        right: 0,
        top: verticalLocation,
      }
    }else if(starting === 'bottomRight'){
      location = {
        right: 0,
        bottom: verticalLocation,
      }
    };

    // Create a unique key to identify the element
    let key = "" + iteration + starting

    return(
      <View key={key} style={{...this.baseRectangleStyle, ...size, ...location}}></View>
    )
  };

  renderLines = (starting) => {
    //start with index+1 b/c 0 will be a width of zero, so no point in doing that math
    return [...Array(this.numberOfRectangles)].map((_, index) => this.fillRectangle(index+1, starting))
  }

  fillRectangles = () => {
    return(
      <React.Fragment>
        {this.renderLines('topLeft')}
        {this.renderLines('bottomLeft')}
        {this.renderLines('topRight')}
        {this.renderLines('bottomRight')}
      </React.Fragment>
     )
   };

  render(){
    let localStyles = styles(this.props)

    return (
      <View style={localStyles.container}>
        <TouchableOpacity
          activeOpacity={.8}
          style = {localStyles.button}
          onPress = {this.props.onPress}
        >
          {this.props.children}
        </TouchableOpacity>

        {this.fillRectangles()}
      </View>
    )
  }
}

const styles = (props) => StyleSheet.create({
  container: {
    position: 'relative',
    zIndex: 0,
  },
  button: {
    backgroundColor: 'rgba(20,174,255,0.31)',
    justifyContent: 'center',
    alignContent: 'center',
    borderRadius: (props.circleDiameter / 2),
    borderWidth: 3,
    width: props.circleDiameter,
    height: props.circleDiameter,
  },
});

The cleaned up code will create a button like this

Final button

Limitations

There are a few limitations to consider

  • The bars don’t cover 100% of the space outside of the circle, but it is close enough for registering or not registering touch events.
  • If the number of bars is high, or the button is rerendered a lot, this code may not be super performant. In my production version, I only render the quadrants that are close to other elements that respond to touch. You could add configuration to conditionally render the quadrants based on a prop value

Setting up Privacy Policy and Terms and Conditions for React Native apps

I am building a simple app using React Native and Expo. Many of the guides mention that the Apple Store requires, and Google Play may require, a Privacy Policy and Terms and Conditions.

Problem

I built my Privacy Policy and Terms and Conditions documents into my React Native Expo app, hardcoding the content in a function. It wasn’t until I started the app submission process, that I found, in addition to the policies being required within the app, the stores also ask for a link to the policies.

Setting up the policies in the app was tedious, and I don’t want to manage online policies, as well as in app ones.

My Solution

My original thought was to publish the documents online, and also somehow render the html/markdown for my policies in a webview within the app. This solution would work, but seemed more complex than it needed to be.

Instead, I decided to publish the policies online, and link to them through the app. (This seems obvious, I know.)

My requirements for managing the policies:

  • Easy to deploy
  • Only have 1 copy of the policies to keep up to date
  • Easy to change policies
  • Easy to regenerate, for a drop in replacement, in case my policy requirements change
  • A process that I can use for future applications

I opted for GitHub Pages to host my policies.

What I like about GitHub Pages:

  • The docs live within the app repo
  • The docs can be in html or markdown, making them easy to update
  • It is very simple. (Pages uses Jekyll, which I am a little familiar with)
  • It is free
  • I trust GitHub

Generating the documents

I used the App Privacy Policy Generator to create a markdown version of the Privacy Policy and Terms and Conditions. I manually added the Expo Privacy Policy to the third party section of the Privacy Policy.

GitHub Pages

The basic setup is easy:

  • Enable Pages under your existing repo “settings”
  • Add a docs folder
  • Add an index.md within the docs folder
  • Push the docs folder to the master branch

The index.md will be published publicly. In a paid plan, the repo can remain private.

The full instructions are here, GitHub Pages, under the “Project Site” tab.

My policies are saved as privacy.md and terms_and_conditions.md, and are linked from the index.md. When published, the urls will include a .html extension.

NOTE: It seems like build process only triggers on index.md changes. You can find the build status under the “Environments” tab of your repo.

React Native

The React Native code is pretty simple. I created a Settings screen which displays the links to my policies. The links are opened in a WebBrowser.

A nice feature of the WebBrowser is that it doesn’t allow the user to type in different addresses. When determining your Apple Store content rating, you must indicate if the app allows for “Unrestricted Web Access”. Answering “yes” to this question gives your app a “17+” rating. If you are only using the WebBrowser in the way described here, you can answer “no” to this question.

Here is the relevant code within the Settings screen:

<View style={styles.legalSection}> 
  <View style={styles.link}> 
    <Anchor href="https://jsparling.github.io/hashmarks/privacy"> 
      Privacy Policy 
    </Anchor> 
  </View> 
  <View style={styles.link}> 
    <Anchor href="https://jsparling.github.io/hashmarks/terms_and_conditions"> 
      Terms and Conditions 
    </Anchor> 
  </View> 
</View>

Anchor.js definition:

import React from 'react';

import {Text} from 'react-native';
import * as WebBrowser from 'expo-web-browser';

const handlePress = (href) => {
  WebBrowser.openBrowserAsync(href);
}

const Anchor = (props) => (
  <Text {...props} style={{color: '#1559b7'}} onPress={() => handlePress(props.href)}>
    {props.children}
  </Text>
)

export default Anchor

Since it doesn’t need to manage its own state, Anchor is a Functional Stateless Component. It will always re-render on a prop change, but it is simple enough, I think that is fine.

Conclusion

Whenever I want to update the policies, all I need to do is update the policy.md and terms_and_conditions.md in my master branch. The users will have access to the updates through the app links.

Use React Native to post to secure AWS API Gateway endpoint

I am setting up a React Native application that will interface with an authenticated API hosted by AWS API Gateway. Here is how I set up my API to be secured through authentication. I am not sure that this will be used in production, but it is working well for testing.

This post will go over the following:

  1. Setting up a very simple React Native application
  2. Adding a simple button that will later be used to get data from an endpoint
  3. Using the react-native-dotenv module for environment set up
  4. Using the react-native-aws-signature module for authorization
  5. Debugging with react-native-aws-signature

Here is the code for this example on githhub

Setting up a very simple React Native application

Start with a brand new react-native application. To set one up, run:

[~] $ react-native init SampleProject
[~] $ cd SampleProject
[~/SampleProject] $ react-native run-ios

You should get something in the simulator that looks like this:

Adding a simple button that will later be used to get data from an endpoint

In the index.ios.js file, add Button to the imports:

import {
  AppRegistry,
  StyleSheet,
  Text,
  View,
  Button
} from 'react-native';


Replace the existing SampleProject Component with this:

export default class SampleProject extends Component {
  constructor(props){
    super(props)

    this.state = {
      textToDisplay: 'no text yet' //state value that will display API response
    }
  }

  // Action that is called when button is pressed
  retrieveData() {
    this.setState({textToDisplay: "button pressed"})
  }

  render() {
    return (
      <View style={styles.container}>
        <Text style={styles.welcome}>
          Welcome to React Native!
        </Text>

        <Button
          onPress={() => this.retrieveData()}
          title="API request"
          color="#841584"
        />

        <Text>
          {this.state.textToDisplay}
        </Text>

      </View>
    );
  }
}

Reloading in the simulator should give you something like this:

If you press the ‘API Request’ link, you should get this:

Using the react-native-dotenv module for environment set up

In a production mobile application, you don’t want to save secret API keys anywhere in the code because it can be reverse engineered. There is a SO post here about it.

That being said, if you are only installing the app on your phone during the testing phase, it is probably fine.

The official react-native-dotenv instructions are here, but this is what I did to set it up.

First, install the module

npm install react-native-dotenv --save-dev

Add the react-native-dotenv preset to your .babelrc file at the project root.

{
  "presets": ["react-native", "react-native-dotenv"]
}

Create a .env file in your project root directory with your AWS credentials and the host.

# DO NOT use secret keys anywhere in your compiled code, even in .env files.
# You should use another method of authorization when this product goes to production
AWS_KEY=your key here
AWS_SECRET_KEY=your secret key here
AWS_REGION=us-west-2
API_STAGE=your api stage name here, mine is test
HOST=your host here, do not include the protocol (http:// or https://)

Now, let’s set up a really simple class that we will use to interface with our API. This should be at the same level as index.ios.js, and mine is called called SampleApi.js.

import { AWS_KEY, AWS_SECRET_KEY, HOST, AWS_REGION, API_STAGE} from 'react-native-dotenv'

class sampleApi {
  static get() {
    // Just return the host value to make sure our .env is working
    return HOST
  }
}

export default sampleApi


Then, somewhere near the top of index.ios.js, import the new class:

import sampleApi from "./SampleApi"

Replace the retrieveData function with:

retrieveData() {
  this.setState({textToDisplay: sampleApi.get()})
}


Our full index.ios.js should now look like:

/**
 * Sample React Native App
 * https://github.com/facebook/react-native
 * @flow
 */

import React, { Component } from 'react';
import {
  AppRegistry,
  StyleSheet,
  Text,
  View,
  Button
} from 'react-native';

import sampleApi from "./SampleApi"

export default class SampleProject extends Component {
  constructor(props){
    super(props)

    this.state = {
      textToDisplay: "not set" // state value that will display API response
    }
  }

  // Action that is called when button is pressed
  retrieveData() {
    this.setState({textToDisplay: sampleApi.get()})
  }

  render() {
    return (
      <View style={styles.container}>
        <Text style={styles.welcome}>
          Welcome to React Native!
        </Text>

        <Button
          onPress={() => this.retrieveData()}
          title="API request"
          color="#841584"
        />

        <Text>
          {this.state.textToDisplay}
        </Text>

      </View>
    );
  }
}

const styles = StyleSheet.create({
  container: {
    flex: 1,
    justifyContent: 'center',
    alignItems: 'center',
    backgroundColor: '#F5FCFF',
  },
  welcome: {
    fontSize: 20,
    textAlign: 'center',
    margin: 10,
  },
  instructions: {
    textAlign: 'center',
    color: '#333333',
    marginBottom: 5,
  },
});

AppRegistry.registerComponent('SampleProject', () => SampleProject);

Note: if you change the .env file only, the simulator will not recognize the change and your changes will not take affect.

Using the react-native-aws-signature module for authorization

Now, we want to actually hit the API when the button is pressed. Start by installing the react-native-aws-signature module

npm install react-native-aws-signature --save

In SampleApi.js, add the import for AWSSignature:

import AWSSignature from 'react-native-aws-signature'

Remove the contents of the get() method in SampleApi.js and start by setting up some variables based on the .env file:

static get() {
  const verb = 'get'
  // construct the url and path for our sample API
  const path = '/' + API_STAGE + '/pets'
  const url = 'https://' + HOST + path

  let credentials = {
    AccessKeyId: AWS_KEY,
    SecretKey: AWS_SECRET_KEY
  }
}

Next, set up the header and options. These will be used to generate the authorization details and they will be used in the request to the API.

let auth_date = new Date();

  let auth_header = {
    'Accept': 'application/json',
    'Content-Type': 'application/json',
    'dataType': 'json',
    'X-Amz-Date': auth_date.toISOString(),
    'host': HOST
  }

  let auth_options = {
    path: path,
    method: verb,
    service: 'execute-api',
    headers: auth_header,
    region: AWS_REGION,
    body: '',
    credentials
  };


Then, create a new AWSSignature object and call setParams. This will generate the authorization header, which we retrieve in the next bit of code:

  let awsSignature = new AWSSignature();
  awsSignature.setParams(auth_options);


Now, retrieve the authorization information and append it to our header.

  const authorization = awsSignature.getAuthorizationHeader();

  // Add the authorization to the header
  auth_header['Authorization'] = authorization['Authorization']

Finally, make the request to the API using the header we just created. We are expecting json back, and I have included some basic error checking.

let options = Object.assign({
  method: verb,
  headers: auth_header
});

return fetch(url, options).then( resp => {
  let json = resp.json();
  if (resp.ok) {
    return json
  }
  return json.then(err => {throw err});
})

Here is what the SampleApi.js file should now look like:

import AWSSignature from 'react-native-aws-signature'
import { AWS_KEY, AWS_SECRET_KEY, HOST, AWS_REGION, API_STAGE} from 'react-native-dotenv'

class sampleApi {

  static get() {
    const verb = 'get'
    // construct the url and path for our sample API
    const path = '/' + API_STAGE + '/pets'
    const url = 'https://' + HOST + path

    let credentials = {
      AccessKeyId: AWS_KEY,
      SecretKey: AWS_SECRET_KEY
    }

    let auth_date = new Date();

    let auth_header = {
      'Accept': 'application/json',
      'Content-Type': 'application/json',
      'dataType': 'json',
      'X-Amz-Date': auth_date.toISOString(),
      'host': HOST
    }

    let auth_options = {
      path: path,
      method: verb,
      service: 'execute-api',
      headers: auth_header,
      region: AWS_REGION,
      body: '',
      credentials
    };

    let awsSignature = new AWSSignature();
    awsSignature.setParams(auth_options);

    const authorization = awsSignature.getAuthorizationHeader();

    // Add the authorization to the header
    auth_header['Authorization'] = authorization['Authorization']

    let options = Object.assign({
      method: verb,
      headers: auth_header
    });

    return fetch(url, options).then( resp => {
      let json = resp.json();
      if (resp.ok) {
        return json
      }
      return json.then(err => {throw err});
    })
  }
}

export default sampleApi


Modify index.ios.js to set the state to include the return value of the request. Since we are getting a json array back, we have to loop through it to make a readable text block:

// Action that is called when button is pressed
retrieveData() {
  sampleApi.get().then(resp => {
    tempText = ""
    // we will get an array back, so loop through it
    resp.forEach(function(pet) {
      tempText += JSON.stringify(pet) + "\n"
    })

    // update our state to include the new text  
    this.setState({textToDisplay: tempText})
  })
}

After you refresh the simulator, you should be able to press the button and receive a screen that looks something like this:

Debugging with react-native-aws-signature

This AWS troubleshooting guide is helpful, but react-native-aws-signature does most of the work for you, so it can be difficult to determine where your mistakes are.

I got this error when I was including the https:// at the beginning of the host parameter in the header. The full error includes what AWS was expecting for the ‘canonical string’ and the ‘string to sign’.

The request signature we calculated does not match the signature you provided. Check your AWS Secret Access Key and signing method.

I figured out how to fix the issue by using the getCanonicalString() and getStringToSign() methods.

var awsSignature = new AWSSignature();

// Set up the params here as described above

console.log("canonical string")
console.log(awsSignature.getCanonicalString())
console.log("string to sign")
console.log(awsSignature.getStringToSign())