Using Amazon Web Services to create a serverless web app

Amazon Web Services (AWS) provides resources that can take the place of a traditional webserver. A huge advantage to this approach is removing the need for the developer to maintain servers, and to allow for easy scaling depending upon use.

In my project, I want to set up mobile app that will use AWS as a backend. I plan on using the following services:

  • Lambda – allows you to run arbitrary code without setting up a server
  • Relational Database Service (RDS) – hosted database. I will be using postgresql
  • Step Functions – Connect services together using visual workflows
  • API Gateway – Create API endpoints to allow your backend to be used outside of AWS

Other technology I will be using

  • Node.js – I am new to JavaScript and want to learn more about it
  • PostgreSQL
  • Bookshelf.js/Knex – I want a well supported ORM that supports PostgreSQL. Bookshelf.js seems robust and since it is built on top of Knex, I can always fall back to Knex for unsupported functionality.
  • node-lambda – Make it easier to manage AWS Lambda deployment

Here is an outline of my steps

  • Set up PostgreSQL and Bookshelf.js
  • Set up hosted database using RDS
  • Create simple lambda that reads from RDS
  • Integrate API Gateway with Lambda
  • Connect 2 Lambdas together with Step Functions
  • Integrate API Gateway with Step Functions

Set up Bookshelf.js for Node.js

Intro

I am going to walk through setting up a brand new Node.js project using Bookshelf and PostgreSQL. At the end, we will have a simple Node.js project that can insert and retrieve data from a database.

Here is what this post will cover

  • Set up a new Node.js project
  • Install necessary libraries to interface with PostgreSQL database
  • Set up process to create a database table
  • Use Bookshelf to
    • insert data
    • retrieve data

The code for this post can be found here.

Why Bookshelf.js?

Bookshelf.js is an Object Relational Mapping (ORM) for Node.js that allows developers to more easily interface with a relational database. It allows the dev to focus on higher level functions, rather than low level queries. It takes care of some basic attribute mapping to make data models simpler. It also allows for the same code to be used against different relational databases in case you want to change the underlying database.

I chose Bookshelf.js because it is well maintained, well documented, and it is built on Knex.js, which is a SQL query building framework. I can use Knex for queries that are not easily supported in Bookshelf.

Install necessary software

Node.js

I am using Node.js 4.3.2 because 4.3 is what is supported in AWS Lambda. If you don’t have node installed, follow these instructions.

[~]$ node -v
v4.3.2

PostgreSQL

Instructions on how to install PostgreSQL. I use Postico to easily interface with the PostgreSQL.

Before we go on, start the database.

[~]$ postgres -D /usr/local/var/postgres

Set up a new Node.js project

Set up the project directory and initialize the project. When you run npm init, it will prompt you to answer some questions, you can use the default values or set your own, at this point they don’t matter too much.

[~]$ mkdir aws_walkthrough
[~]$ cd aws_walkthrough
[~/aws_walkthrough]$ npm init

Install the node modules that we will need, the -save option will add the modules to the package.json file.

[~/aws_walkthrough]$ npm install knex bookshelf pg dotenv -save

Here is what each module does

  • bookshelf – the ORM we will be using
  • knex – required by bookshelf, but in the future it may not be included automatically
  • pg – the postgresql module
  • dotenv – a utility that makes dealing with environment variables easy

Here is our current package.json

{
 "name": "aws_walkthrough",
 "version": "0.1.0",
 "description": "A sample project using AWS",
 "main": "index.js",
 "scripts": {
   "test": "echo \"Error: no test specified\" && exit 1"
 },
 "author": "Jake Sparling",
 "repository" : {
   "type" : "git",
   "url" : "https://github.com/jsparling/aws_walkthrough"
 },
 "license": "ISC",
 "dependencies": {
   "bookshelf": "^0.10.3",
   "dotenv": "^4.0.0",
   "knex": "^0.12.7",
   "pg": "^6.1.2"
 }
}

The dotenv module reads from a .env file in the project directory. This will set the environment variables. Right now we only need to set which environment we are in.

NODE_ENV=development

Hello (node) world

Let’s create a simple javascript file named index.js that will show that we have node working.

'use strict'

console.log("node is working")

Now, make sure that it works

[~/aws_walkthrough]$ node index.js
node is working
[~/aws_walkthrough]$

Create a database

Let’s create our database, and verify that it exists.

[~/aws_walkthrough] $ createdb aws_walkthrough

#verify that the db exists, use '\q' to exit psql
[~/aws_walkthrough]$ psql aws_walkthrough
psql (9.4.0)
Type "help" for help.

aws_walkthrough=#


Create table in database

Set up a knexfile.js config file for Knex. This tells Knex how to connect to the database, notice there are entries for development and production. Right now we care most about development.

// Update with your config settings.
require('dotenv').config()

module.exports = {
  development: {
    client: 'pg',
    connection: {
      database: 'aws_walkthrough'
    },
    pool: {
      min: 2,
      max: 10
    },
    migrations: {
      tableName: 'knex_migrations'
    }
  },

  production: {
    client: 'pg',
    connection: {
      host: process.env.DB_HOST,
      database: 'aws_walkthrough',
      user:     process.env.DB_USER,
      password: process.env.DB_PASS
    },
    pool: {
      min: 2,
      max: 10
    },
    migrations: {
      tableName: 'knex_migrations'
    }
  },
};


Now create a migration that will define our table. The resulting XXXXX_create_table.js file is just a blank template that we will fill out. Yours will have a different date and time in the name.

[~/aws_walkthrough] $ knex migrate:make create_table
Using environment: development
Created Migration: /Users/jake/aws_walkthrough/migrations/20170219092242_create_table.js
[~/aws_walkthrough] $

Later, we will be using the test jsonAPI here. To keep it simple, let’s just create a table that replicates the post resource, which has data like this:

{
  "userId": 1,
  "id": 1,
  "title": "sunt aut facere repellat providen",
  "body": "quia et suscipit suscipit recusandae"
}

Edit the XXXXX_create_table.js file to include the columns we want our table to have. Mine looks like this

exports.up = function(knex, Promise) {
  return Promise.all([
    knex.schema.createTable('articles', function(table) {
      table.increments('id').primary();
      table.integer('remote_id').unique();
      table.text('title');
      table.text('body');
      table.timestamps();
    })
  ])
};

exports.down = function(knex, Promise) {
  return Promise.all([
    knex.schema.dropTable('articles')
  ])
};


This will create a table called ‘articles’.  We have an id field that will automatically increment when we insert new records. The remote_id is the id from the test service, we want to be sure that we don’t have duplicates, so we use the .unique() method. The table.timestamps(); command will add a created_at and updated_at column that are automatically populated when a record is added or updated. I have excluded the user_id that appears in the test API to keep the table simple.

The exports.down function defines what should happen if we rollback the migration, in general this should do the reverse of what the exports.up function does.

Now, run the migration with knex migrate:latest, and make sure the table exists.

~/aws_walkthrough] $ knex migrate:latest
Using environment: development
Batch 1 run: 1 migrations
/Users/jake/aws_walkthrough/migrations/20170219092242_create_table.js
[~/aws_walkthrough] $


[~/aws_walkthrough] $ psql aws_walkthrough
psql (9.4.0)
Type "help" for help.

aws_walkthrough=# \d articles
                                    Table "public.articles"
   Column   |           Type           |                       Modifiers
------------+--------------------------+-------------------------------------------------------
 id         | integer                  | not null default nextval('articles_id_seq'::regclass)
 remote_id  | integer                  |
 title      | text                     |
 body       | text                     |
 created_at | timestamp with time zone |
 updated_at | timestamp with time zone |
Indexes:
    "articles_pkey" PRIMARY KEY, btree (id)
    "articles_remote_id_unique" UNIQUE CONSTRAINT, btree (remote_id)

aws_walkthrough=#

Set up Bookshelf

Start with a bookshelf.js file that will allow us to use bookshelf in other files.

'use strict'

// Set up knex using the config file for the environment
var knex = require('knex')(require('./knexfile')[process.env.NODE_ENV])

// set up bookshelf using the knex setup we created above
var bookshelf = require('bookshelf')(knex)

// make sure bookshelf is available when importing this file
module.exports = bookshelf

Create a model class for the articles table that we can use to interface with the table. By extending the bookshelf.Model, we get functionality that allows us to access the attributes of the table as methods on the Article variable.

'use strict'

var bookshelf = require('./../bookshelf')

// create the Article model, it will include all of the attributes of the table.
// the hasTimestamps: true command will automatically populate the created_at and updated_at columns
var Article = bookshelf.Model.extend({
  tableName: 'articles',
  hasTimestamps: true
})

module.exports = Article


Insert data into the table

Edit index.js to create a new entry in the articles table

'use strict'

var bookshelf = require('./bookshelf')
var Article = require("./models/article")

var insertArticle = (callback) =>{
 // create a new entry in articles database
 new Article({
   title: "Sample title",
   body: "Sample body"
 }).save()
 .then(function(saved) {
   console.log(saved)
   const insertedId = saved.attributes.id

   callback(insertedId)
 })
}

// insert the article, and when we are done, destroy connection and get the inserted article
insertArticle(function(id){
  bookshelf.knex.destroy()
  console.log("inserted article with id: " + id)
})

Run index.js and make sure that it adds data to the table.

[~/aws_walkthrough] $ node index.js
ModelBase {
  attributes:
   { title: 'Sample title',
     body: 'Sample body',
     updated_at: Sun Feb 19 2017 10:34:22 GMT-0800 (PST),
     created_at: Sun Feb 19 2017 10:34:22 GMT-0800 (PST),
     id: 6 },
  _previousAttributes:
   { title: 'Sample title',
     body: 'Sample body',
     updated_at: Sun Feb 19 2017 10:34:22 GMT-0800 (PST),
     created_at: Sun Feb 19 2017 10:34:22 GMT-0800 (PST),
     id: 1 },
  changed: {},
  relations: {},
  cid: 'c1',
  _knex: null,
  id: 1 }
inserted article with id: 1


[~/aws_walkthrough] $ psql aws_walkthrough
psql (9.4.0)
Type "help" for help.

aws_walkthrough=# select * from articles;
 id | remote_id |    title     |    body     |         created_at         |         updated_at
----+-----------+--------------+-------------+----------------------------+----------------------------
  1 |           | Sample title | Sample body | 2017-02-19 10:34:22.967-08 | 2017-02-19 10:34:22.967-08
(1 row)

aws_walkthrough=#

Retrieve data from the database

Now, modify index.js to also query the database for the article we just inserted. Below we have added the getInsertedArticle function, commented out the code that just did the insert, and added some new code to insert and then retrieve the record.

'use strict'

var bookshelf = require('./bookshelf')
var Article = require("./models/article")

var getInsertedArticle = (id, callback) =>{
  console.log("\nNow get the article from the db\n")
  Article.where('id', id).fetch().then(function(article) {
    callback(article)
  })
}

var insertArticle = (callback) =>{
  // create a new entry in articles database
  new Article({
    title: "Sample title",
    body: "Sample body"
  }).save()
  .then(function(saved) {
    console.log(saved)
    const insertedId = saved.attributes.id

    callback(insertedId)
  })
}

// insert the article, and when we are done, destroy connection and get the inserted article
// insertArticle(function(id){
//   bookshelf.knex.destroy()
//   console.log("inserted article with id: " + id)
// })

insertArticle(function(id) {
  getInsertedArticle(id, function(article) {
    bookshelf.knex.destroy()
    console.log(article)
  })
})


Done

That is it. There are many more things we can do with a database, like create relationships, do complex joins, etc., but this is a good starting point.

Here is a link to the code from this post.
Working with servos and an Arduino Nano clone

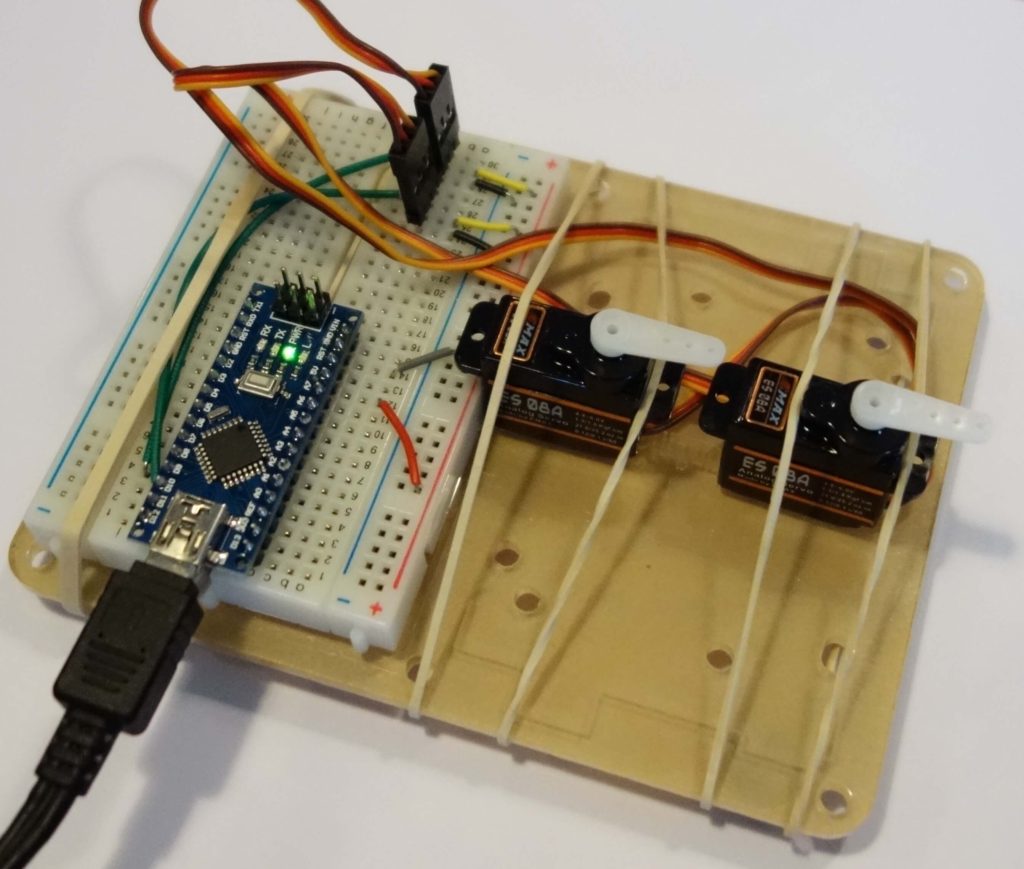
Over the past few weeks I have been working on building the software to allow my RC Sailboat to sail autonomously. To keep the form factor as small and light as possible, I bought a cheap Arduino Nano clone to use in place of an Arduino Uno.

Nano with rudder and Sail
Nano microcontroller with servos for sail and rudder control

Obstacle 1: drivers

My first obstacle was getting my mac to communicate with the board. The basic issue is that the WCH340G USB interface chip on the clone is different than the FTDI FT232RL used on the authentic Arduino Nano. There are many sites with instructions and links to drivers, but this one had the most up to date driver that was signed. The older drivers were not signed and required me to bypass OSX’s security to allow unsigned drivers. direct link to driver download

Obstacle 2: consistent power

I had some semi-working software running on the Uno that would adjust a sail and rudder servo. When I swapped in the Nano the servos generally worked, but would sometimes move wildly or jitter. Since the Nano and Uno are very similar (chip, ram, clock speed, etc.) I figured the issue was going to be with the power or maybe the WCH340G USB chip.

To troubleshoot, I used my voltmeter to see how the Nano voltage changed while adjusting the servos. When not moving the servos, it put out 4.8V on the 5V pin and while moving the servos simultaneously it would drop to ~4.2V. The servos expect 4.8-6V so this could contribute to the issue. As reference, the Uno put out 5V, I didn’t test it while moving servos.

In the past I have had issues with macs not putting out enough voltage through USB, and I have a cord that includes 2 plugs, one for power and one for power+data. The cord is similar to this one.

I swapped out the cords and the servos started behaving as expected. My guess is that a combination of data transfers (to signal the servo change) and keeping a consistent power supply were too much for the single cord.

Since I want to run the system without my computer, I think the USB cord is not the best solution. A couple of alternative options are a separate power supply for the servos, or using a capacitor to smooth out the power.

To keep down weight and complexity, I took the capacitor approach. I found many sources that said a minimum of 470uF was the correct capacity and that the voltage rating should be 3x what you have in the system. I added a single 1000uF/25V capacitor with the old cord and the servos behaved well. The servos also worked well with three 100uF/16V capacitors in parallel, but I prefer the single capacitor solution.

How to display Google Earth maps on website

Updated: April 17, 2020

This post shows how to export a Google Earth route, and import it in Google Maps, to then be embedded in a webpage.

When I hike, I track my routes with a GPS and import them into Google Earth. This works great on my personal computer, but it doesn’t allow me to easily embed the maps on a webpage. To allow others to view my maps, I import them into Google Maps and then embed these custom maps on my webpage.

Steps to embed Google Earth routes on webpage using Google Maps

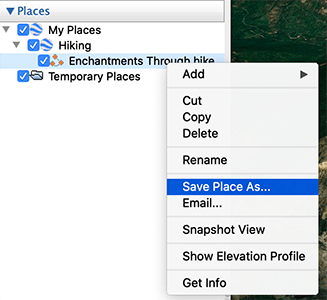
  1. In Google Earth, right click on the route you want to save and select “save place as”

2. Save the file as a .kml

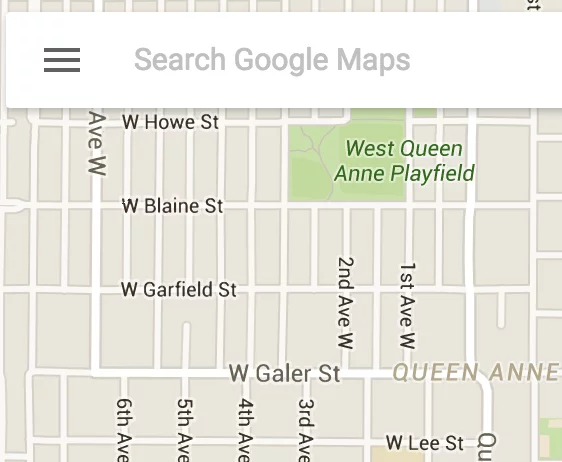
3. Sign in to Google Maps and open the menu on the left side of the search bar by clicking the three line icon

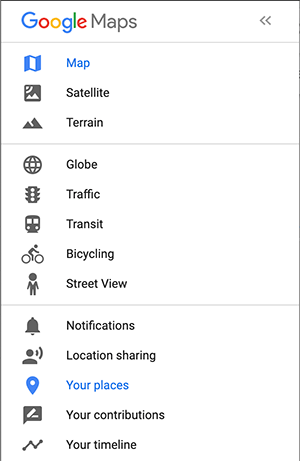
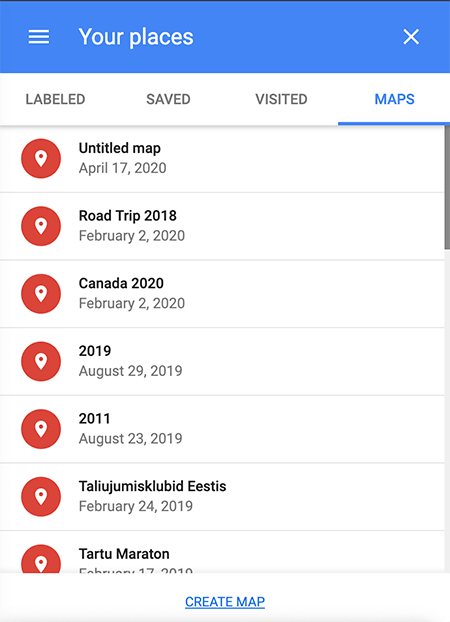
4. Within the menu, select “Your Places”, then the “Maps” tab.

5. This page will show all of your custom maps, click the “Create Map” link at the bottom of the page

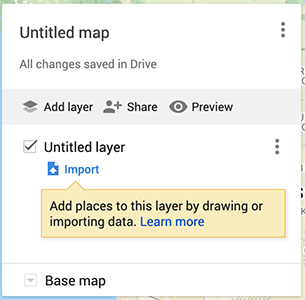
6. The map edit screen will open with one map layer created for you. Click “import” under the layer. This will let you select the .kml file that you created earlier.

7. If you want to add multiple routes to the same map (for instance a multi-day hike), add a new layer with the “Add layer” link, and import a separate .kml file.

8. You can change the look of the map. These changes will be reflected on the embedded map if you change them in the future.

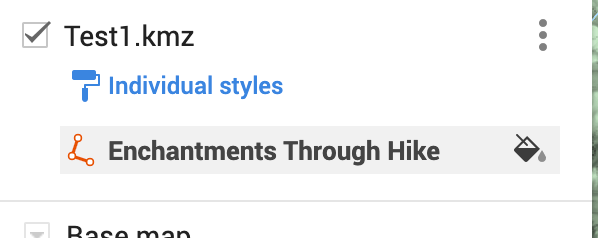
  • To change the color of the route, mouse over the name at the bottom of the layer section (“Enchantments Through hike” in the images below) and click the paint bucket icon.
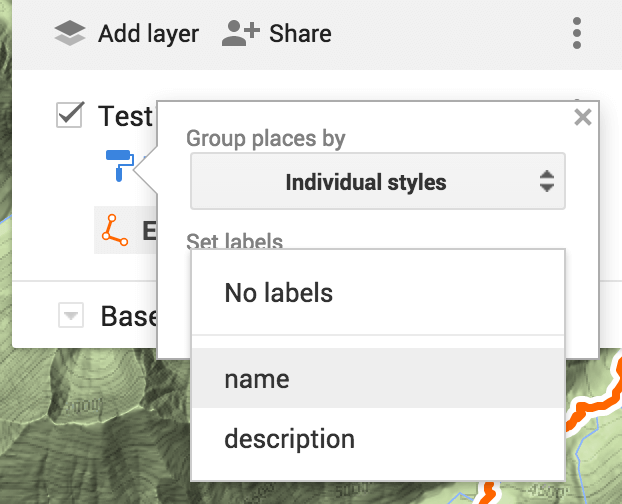
  • To add a label to the route, click on the “Individual styles” link and select the label you want to show.
  • You can change the type of map (terrain, satellite, etc.) from the “Base Map” link under the layers section.

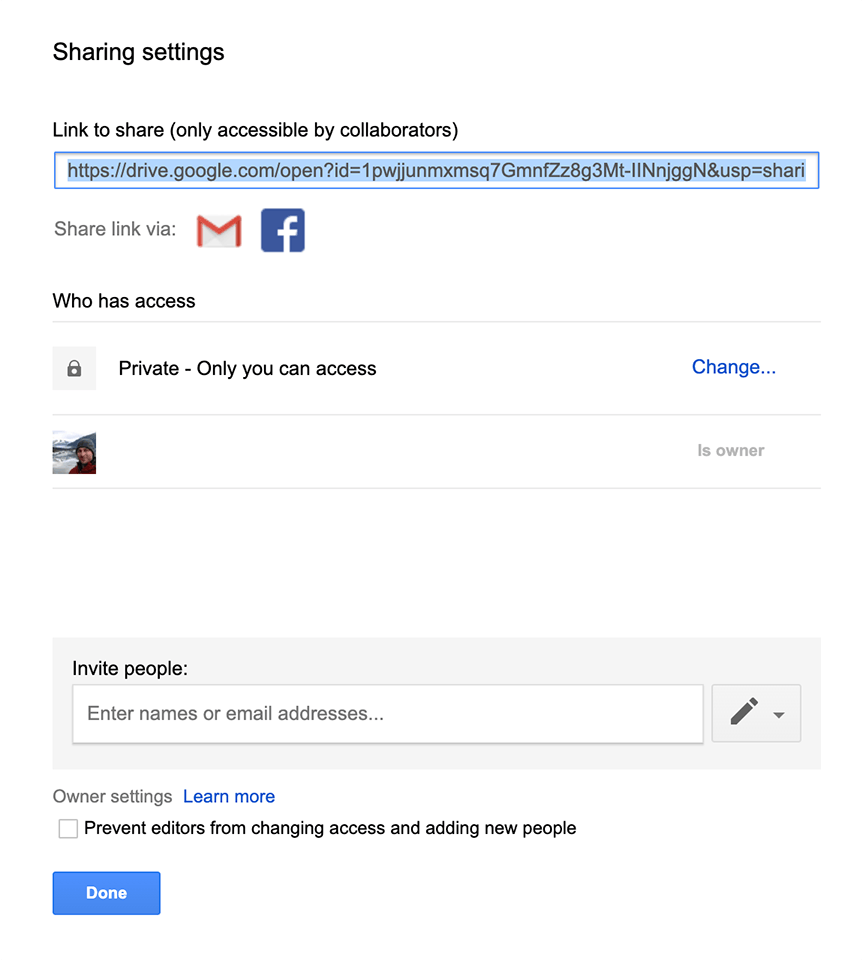
9. In order to embed the map, click the “share” link above the layers section. On the “Sharing settings” screen, select “Change…” on the “Private – Only you can access”.

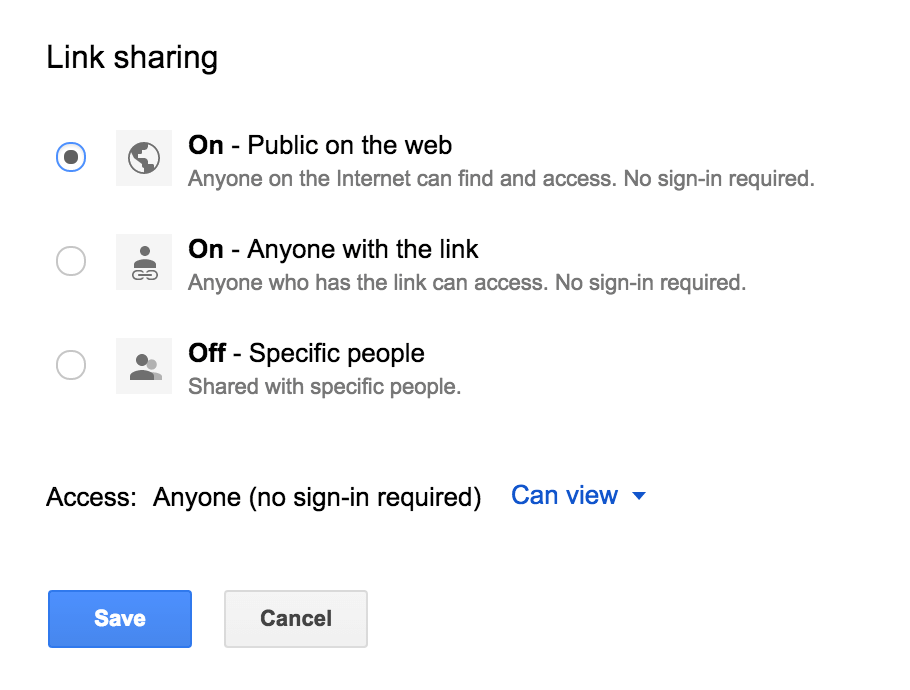
10. On the “Link sharing” page, select “On” to make the map public.

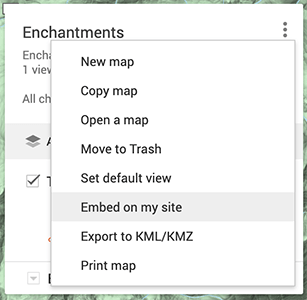
11. Once the map is public, you can select the “Embed on my site” item from the main map menu.

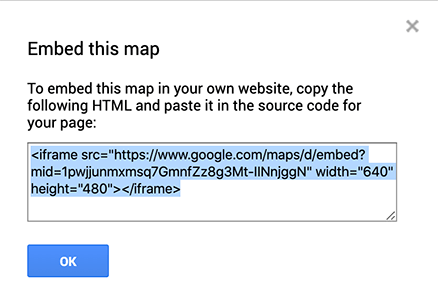
12. Insert the provided code on your site, and you are done.

Here is an example of an embedded map

Connecting a Shaft Encoder to Fio

After figuring out my voltages, I wanted to connect the shaft encoder to the Fio and make sure it worked.

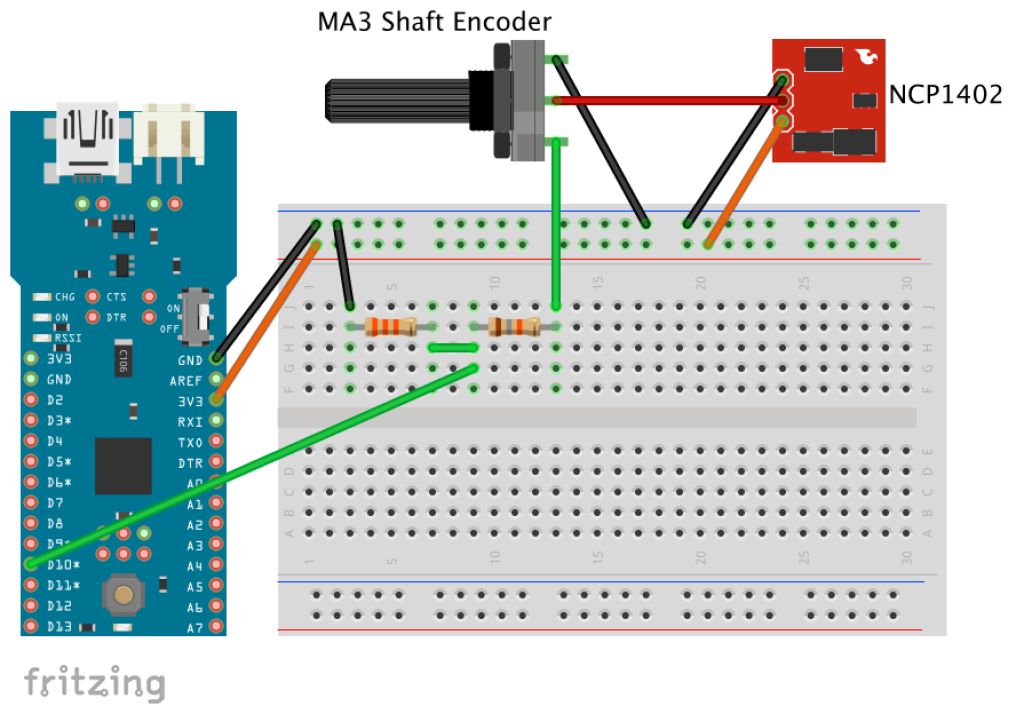
I started by creating a diagram (Diagram 1) for the breadboard.

Breadboard Fio with Step Up and Encoder
Diagram 1: Fio with Encoder and Step Up Breakout.

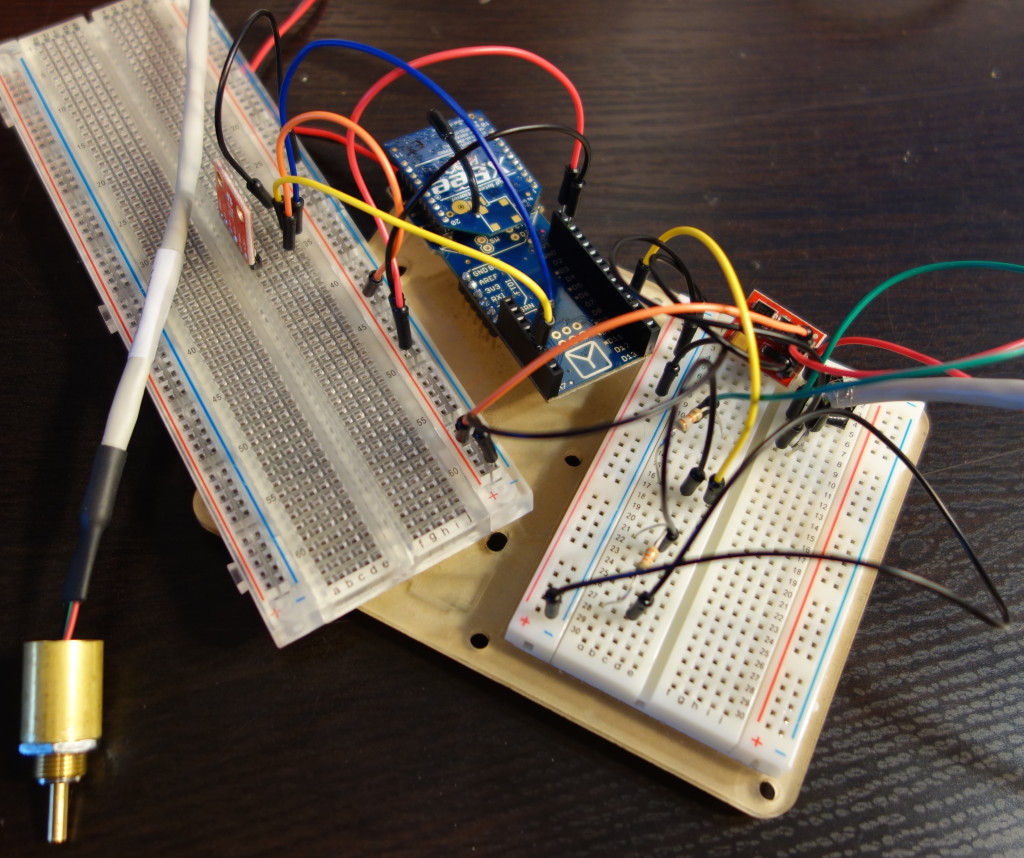
I built out the circuit on a breadboard and added it to my mess of wires, which included the accelerometer I had already connected to the Fio.

fio with breadboards
Fio with accelerometer and shaft encoder

I created a simple program to display the values from the shaft encoder to a terminal on my computer. The most up to date code is available here.

/*
 * Simple program to collect data from an MA3 Shaft Encoder with PWM
 *
 * Values should be between 0 and 1023,
 * but sometimes mine returns greater than 1023
 */

int encoder_pin = 10; // digital pin 10
int encoder_value = 0;

void setup()
{
  pinMode(encoder_pin, INPUT);
  Serial.begin(57600); // baud rate of XBee
}

void loop()
{
  // read the time between HIGH values
  encoder_value = pulseIn(encoder_pin, HIGH);

  // send the data to XBee
  Serial.print("encoder value: ");
  Serial.print(encoder_value);
  Serial.write(10); //ascii line feed

  // wait 1 second, then loop again.
  delay(1000);
}


The values displayed on my terminal vary between 0 and ~1023. Sometimes I get values greater than 1023 and the values change when the encoder isn’t moving. I am not sure what is contributing to this variance, but in the future I will try to eliminate this noise with software by averaging the values over time and limiting the max to 1023.

Preparing to Add a Shaft Encoder to Arduino Fio

The Arduino Fio is a 3.3V board, which means the inputs and outputs are 3.3V. The MA3 Shaft Encoder requires 5V input and outputs at 5V.

In order for the Fio to work with the Shaft Encoder, I need to convert voltages twice:

  • Stepping up the 3.3V to 5V for the Shaft Encoder input
  • Stepping down the Shaft Encoder output from 5V to 3.3V so it could be input into the Fio 3.3V input.

I didn’t know exactly how to do this, so I started simple and worked my way up.

Convert 5V output to 3.3V input

First, I wanted to convert 5V output to 3.3V input. This would be the part connecting the encoder output (5V) to the Fio input (3.3V).

Through research, I determined that I would need to build a voltage divider, which uses the formula:
Vout = Vin * (R2 / (R1 + R2))
R1 is the resistance between the input and the output, and R2 is the resistance between the output and the ground. Since my desired Vout is 3.3 and my Vin is 5, I was looking for resistors where R1 was half the resistance of R2.

Since the ratio between the resistors is key, I could have used resistors with large or small resistance. In voltage dividers, the smaller the overall resistance the more accurate the output, the tradeoff is that more energy would be wasted. Since I am using battery power, but also care about accuracy, I wanted something in between. This post describes it pretty well.

Also, the formula assumes a perfect environment where the only resistance is through the resistors. In my circuit, the current drawn from the input pin would reduce the ratio between the resistors.

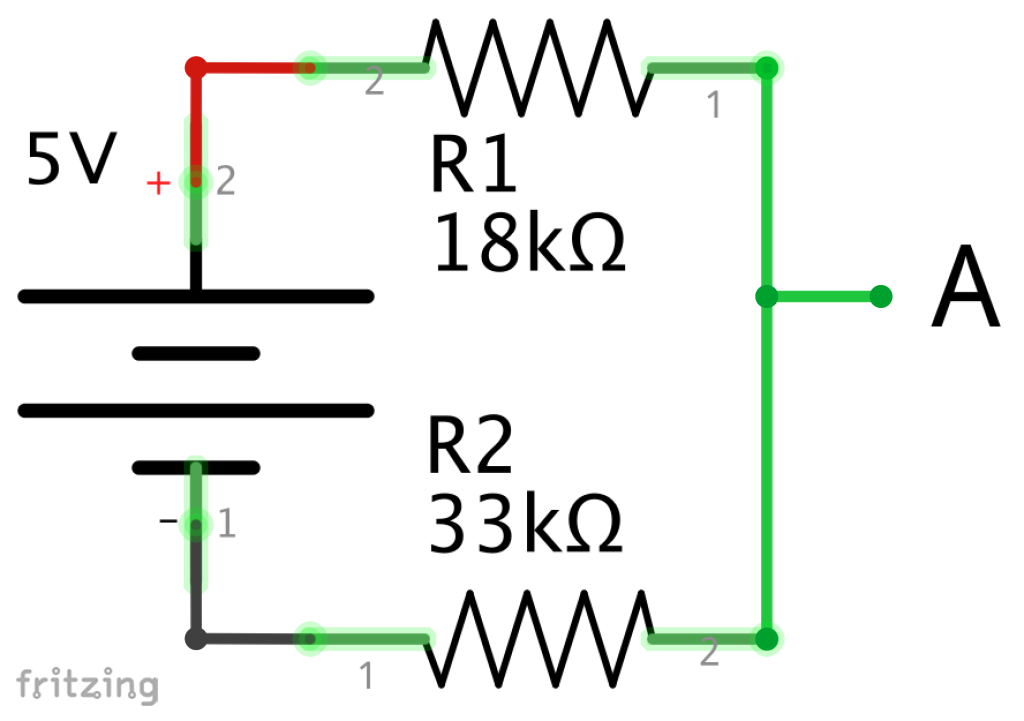
I am using PWM input, which is measuring the time between the peaks in voltage, so it isn’t super critical that I have exactly 3.3V. Based on this post I went with an 18k and 33k resistor, which should give me a peak of around 3.23V.

I built the circuit shown in Schematic 1.

Using my multimeter I measured

  • 5V between the 5V input and ground
  • 3.3V between A and ground
5V to 3.3V Schematic
Schematic 1: 5V to 3.3V at “A”

Supply 5V power to encoder, converting its output to 3.3V

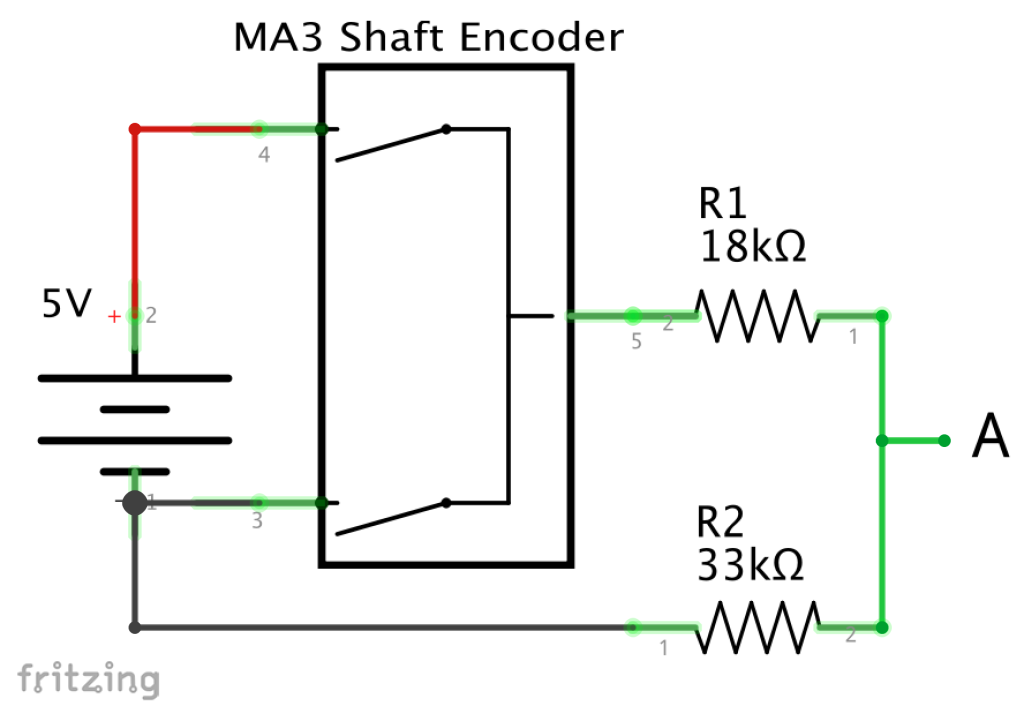
My next step was to add the encoder to the circuit to make sure it could receive 5V of power, but have the output reduced to 3.3V.

Schematic 2 shows the circuit, though I am not sure that the image used for the encoder is appropriate.

I measured

  • 5V between the 5V input and ground
  • Max 3.15V between A and ground (depending on position of encoder)
5V to encoder to 3.3V Schematic
Schematic 2: 5V Encoder input with 3.3V output at “A”

When I first measured at A, it was a lot less than 3.3V. I then turned the encoder and found that I could increase the voltage up to 3.15V. The encoder is using PWM and the voltage should be jumping between 0 and 3.15V with varying spaces between the highs and lows. My multimeter must average the voltage it is receiving, rather than show the peak.

I think the 3.15V is probably due to variations in individual resistors.

Convert 3.3V to 5V for Encoder input, and 5V to 3.3V for Encoder output

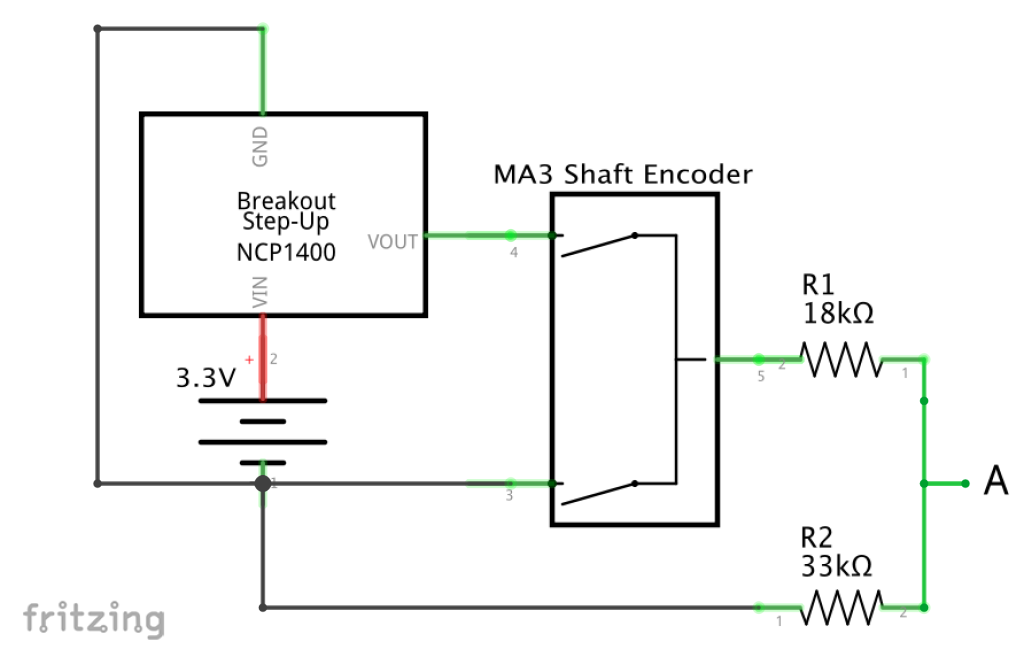
My final step before moving to the Fio was to use my 5V step up board to take a 3.3V input and output 5V to the encoder.

Schematic 3 shows the circuit I used. The part number on the step up should be NCP1402, not 1400.

I measured

  • 5V between the input to the encoder and the ground.
  • 5V between left side of R1 and ground.
  • Max 3.15V between A and ground (depending on position of encoder)
Step up and encoder schematic

Schematic 3: 3.3V input, stepped up to 5V for encoder, with output reduced to 3.3V at “A”.

Next Step:

Connecting the Shaft Encoder to Fio

Arduino Fio and XBee

I had several criteria for selecting the onboard Arduino.

  1. It should be as light as possible to keep boat weight down. This includes the battery.
  2. It should have low power consumption to reduce the number of times I have to access it in the boat hull.
  3. It should be as small as possible due to limited space in the boat.
  4. It should be able to gather information from several sensors.
  5. It should be able to transmit the data wirelessly through an XBee.

The Arduino Fio seems like an ideal choice because it fits the criteria and they are pretty cheap.

I had previously set up my XBees (Pro Series 1) to communicate with each other using an Arduino Uno (on shore) and Arduino Mega (on boat). I thought I would be able to seamlessly upload the sketch that was used on the Mega onto the Fio, but no such luck. I was getting only garbage characters coming through. After hours of rechecking XBee settings and stepping through iterations of XBee/Computer/Arduino setups, I found that the issue was how the Fio treats the XBee serial connection.

On the Mega and Uno, I use SoftwareSerial to communicate with the XBee. On the Fio, you can write and read directly from Serial, like the code below. The most up to date code is here.

/*
 * A simple example program that will send text every second.
 * I use this to make sure my Fio and XBee are working appropriately.
 *
 * I hook another XBee up to my computer with an breakout board and
 * use CoolTerm to display the messages.
 */

void setup() {
  Serial.begin(57600);	// opens port at 57600 bps
}

void loop() {
  Serial.print("Fio is working");
  Serial.write(10); //ascii line feed

  // wait 1 second then loop again
  delay(1000);
}

This makes sense when you remember that the Fio has a restriction where you can use the UART connection or the XBee, but not both at the same time.

At first I was hesitant to tackle uploading the sketches over the XBee, but the tutorial here was great. A couple pieces of information I wish I knew when I started:

  • Use a baud rate of 57600 so you don’t have to reprogram the XBees.  The tips section mentions this, but the description was confusing to me.
  • You don’t have to reconfigure the XBees when you are done uploading your sketches. The XBees can still be used to communicate Arduino to Arduino when set up to bootload to the Fio.

Arduino Enabled RC Sailboat

While in the HCDE program at University of Washington, I took a Physical Computing course which introduced me to Arduino.

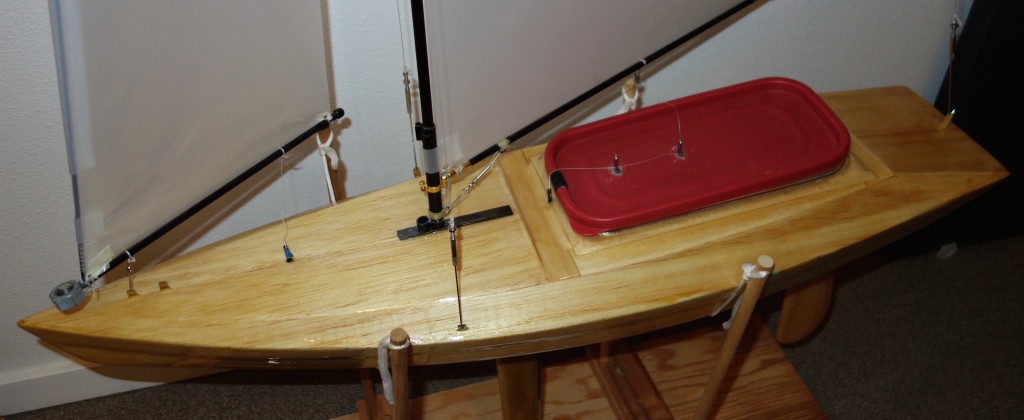
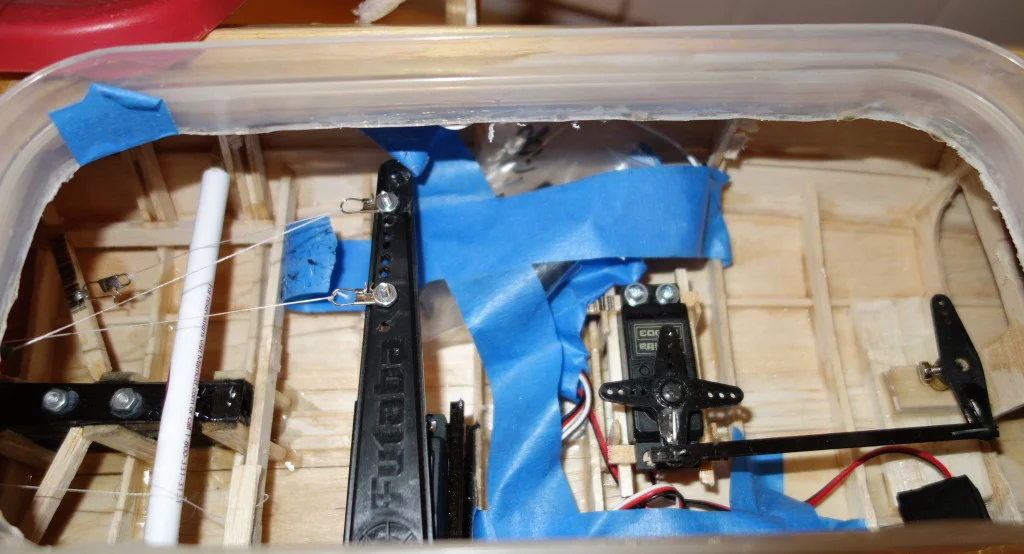
My current project is to incorporate an Arduino into my 30 inch radio controlled sailboat that I built a few years ago. My end goal is to integrate the Arduino to automate basic sailing controls like sail trim and rudder control.

To start, I want to collect information from the boat and transmit it to shore.

  • Wind Direction in relation to boat
    • Gathered with a wind vane connected to a rotary encoder.
    • Will show the apparent wind in relation to the boat. Apparent wind will change based on boat speed, this is fine because the sails are trimmed to the apparent wind.
  • Boat Heel and Pitch
    • A three axis accelerometer will detect boat heel as well as pitch.

The system consists of two Arduinos, one on shore and another on the boat.

  • The on-boat microprocessor gathers data from the sensors, does some data formatting, and then sends the data wirelessly to the on-shore Arduino.
  • The on-shore microprocessor receives the data and displays it on an LCD screen.

In the future, I may include additional data

  • Sail Position
  • Wind Speed
  • Boat Speed
  • Location of (or proximity to) other boats
  • Location of course markers